This article also available on Medium
A SimpleGAS is a set of tutorials for entry-level Unreal Engine enthusiasts who wants to leverage the power of the Gameplay Ability System in their prototypes. While there are great tutorials and GitHub repositories which cover the topic of GAS in more depth, this tutorial is requiring a minimum C++ setup and showcases working examples built entirely using Blueprints. This tutorial is for those who are new to Unreal Engine gameplay/multiplayer development or simply need an easy headstart before diving into more sophisticated GAS-related content.

Intro
Welcome back! In Part 1 of the tutorial series, we covered a basic ability set up to launch a grenade projectile using the minimum code required to work with Gameplay Abilities. Today we are going to add a player character attribute set, deal damage using gameplay effects, and touch a topic of replication system in Unreal Engine.
In the end, you will find the link to the Simple GAS repository, as well as other useful resources to follow after completing this tutorial.
Attribute Set
Think of attribute sets as of... well classic character attributes in your favorite RPG game. Health, Mana, Stamina, Damage, Resistance, etc. If Abilities are the bones of the Gameplay Ability System, then the Attributes are its blood. In GAS they act not just as a replicated property storage for your characters and systems but also can control states of your game without writing complicated logic to handle dozens of edge cases.
To create a basic attribute set for our player character, create a new class inherited from UAttributeSet and add the following declarations to the header file:
#pragma once

#include "CoreMinimal.h"
#include "AttributeSet.h"
#include "AbilitySystemComponent.h"
#include "CharacterBaseAttributeSet.generated.h"

// Macros from AttibuteSet.h to generate boilerplate code for getters and setters.
#define ATTRIBUTE_ACCESSORS(ClassName, PropertyName) \    GAMEPLAYATTRIBUTE_PROPERTY_GETTER(ClassName, PropertyName) \    GAMEPLAYATTRIBUTE_VALUE_GETTER(PropertyName) \    GAMEPLAYATTRIBUTE_VALUE_SETTER(PropertyName) \    GAMEPLAYATTRIBUTE_VALUE_INITTER(PropertyName)

/**
 *
 */
UCLASS()
class SIMPLEGAS_API UCharacterBaseAttributeSet : public UAttributeSet
{
    GENERATED_BODY()

public:

    UCharacterBaseAttributeSet();

    UPROPERTY(BlueprintReadOnly, Category = "Health", ReplicatedUsing = OnRep_Health)
    FGameplayAttributeData Health;
    ATTRIBUTE_ACCESSORS(UCharacterBaseAttributeSet, Health)

    virtual void GetLifetimeReplicatedProps(TArray<FLifetimeProperty>& OutLifetimeProps) const override;

protected:

    UFUNCTION()
    virtual void OnRep_Health(const FGameplayAttributeData& OldHealth);
};
Create implementation of the constructor in the .cpp file and initialize Health value to 100.
UCharacterBaseAttributeSet::UCharacterBaseAttributeSet() :
    Health(100.0f)
{
}
Because we specified our attribute as being replicated using the ReplicatedUsing = OnRep_Health keyword in UPROPERTY parameters, we need to declare and implement the OnRep_Health function.
void UCharacterBaseAttributeSet::OnRep_Health(const FGameplayAttributeData& OldHealth)
{
    GAMEPLAYATTRIBUTE_REPNOTIFY(UCharacterBaseAttributeSet, **Health**, OldHealth);
}
And because our attributes are natively replicated properties, our UCharacterBaseAttributeSet class must override a GetLifetimeReplicatedProps function.
If you want to expand an attribute set with more attributes, for each attribute you need to add a new DOREPLIFETIME_CONDITION_NOTIFY line with a new attribute as a parameter.
void UCharacterBaseAttributeSet::GetLifetimeReplicatedProps(TArray<FLifetimeProperty>& OutLifetimeProps) const
{
    Super::GetLifetimeReplicatedProps(OutLifetimeProps);

    DOREPLIFETIME_CONDITION_NOTIFY(UCharacterBaseAttributeSet, **Health**, COND_None, REPNOTIFY_Always);
}
ASimpleGasCharacter class
Add the following header file to the character class header.
#include <Runtime/Engine/Public/Net/UnrealNetwork.h>
Declare our BaseAttributeSet property. Adding the 'class' keyword makes the variable an inline forward declared and requires no UCharacterBaseAttributeSet header file in our ASimpleGasChatacter header, as we do not access class specific functionality.
/** Base Set Of Attributes */
    UPROPERTY(VisibleAnywhere, BlueprintReadOnly, Category = Abilities, meta = (AllowPrivateAccess = "true"))
    class UCharacterBaseAttributeSet* BaseAttributeSet;
Declare OnHealthAttributeChanged function, which we later will add to a GAS-specific attribute change delegate. Gameplay Ability Tasks rely on this function to provide a functioning tracking of attribute changes. Add a dummy implementation to the .cpp file.
protected:

    **virtual void OnHealthAttributeChanged(const FOnAttributeChangeData& Data);**

    void BeginPlay() override;
void ASimpleGASCharacter::OnHealthAttributeChanged(const FOnAttributeChangeData& Data)
{
    float Health = Data.NewValue;
    UE_LOG(LogTemp, Warning, TEXT("Health: %f"), Health);
}
As you should have to get used to the process already, create the default subobject of our attribute set class inside the ASimpleGASCharacter class constructor.
// Create a follow camera
    FollowCamera = CreateDefaultSubobject<UCameraComponent>(TEXT("FollowCamera"));
    FollowCamera->SetupAttachment(CameraBoom, USpringArmComponent::SocketName); // Attach the camera to the end of the boom and let the boom adjust to match the controller orientation
    FollowCamera->bUsePawnControlRotation = false; // Camera does not rotate relative to arm

    AbilitySystemComponent = CreateDefaultSubobject<UAbilitySystemComponent>(TEXT("AbilitySystemComponent"));

    **BaseAttributeSet = CreateDefaultSubobject<UCharacterBaseAttributeSet>(TEXT("AttributeSet"));**
Our player character will have multiple startup abilities, which are not bound to the specific input. That's why we have to change a startup ability variable declaration to the TArray container and grant those abilities on the startup. Change your existing code in the BeginPlay function to:
void ASimpleGASCharacter::BeginPlay()
{
    Super::BeginPlay();

    if (AbilitySystemComponent)
    {
        **FGameplayAbilityActorInfo* actorInfo = new FGameplayAbilityActorInfo();
        actorInfo->InitFromActor(this, this, AbilitySystemComponent);
        AbilitySystemComponent->AbilityActorInfo = TSharedPtr<FGameplayAbilityActorInfo>(actorInfo);

        for(const auto& StartupAbility : StartupAbilities)
        {
            if (StartupAbility && HasAuthority())
            {
                AbilitySystemComponent->GiveAbility(FGameplayAbilitySpec(StartupAbility.GetDefaultObject(), 1, 0));
                AbilitySystemComponent->InitAbilityActorInfo(this, this);
            }
        }**

        **AbilitySystemComponent->GetGameplayAttributeValueChangeDelegate(BaseAttributeSet->GetHealthAttribute()).AddUObject(this, &ASimpleGASCharacter::OnHealthAttributeChanged);**
    }
}
At the bottom, we also bound our OnHealthAttributeChanged function to GetGameplayAttributeValueChangeDelegate delegate, which now will listen to the changes in our Health attribute.
Death Ability
In the beginning, I’ve mentioned how the attributes are the blood of the system and how the attribute changes can change the state of the game with as much as one Blueprint node. A Death ability is a perfect candidate to showcase this. Create a GA_DeathAbility blueprint and implement the following logic in its blueprint graph:

The essential function of the Death ability is to listen to the changes in our Health attribute and do something (e.g change a state of our character) once the attribute meets a certain condition.
That what is the Wait for Attribute Change with Comparison task is doing, then the known from the last tutorial PlayMontageAndWait tasks playbacks a selected montage (in this case its the same montage used at the start of the match, but you can modify it with one of your choice) and Ends ability afterward. When ability ends, we get an owning actor, cast to ThirdPersonCharacter, and call EventDie and Reset event declared in the character blueprint.
This ability is given to a player character on the startup and activated in its OnPossesed blueprint event using its Ability Tag.

EventDieAndReset event declared in the character blueprint calls ApplyGameplayEffectToSelf function which uses gameplay effect GE_RestoreHealth to restore character health attribute to its default maximum.

Finally, we reached the most interesting part of this tutorial and the most powerful trick on the sleeve of GAS.
Gameplay Effects
Open a GE_RestoreHealth class or create your own by selecting GameplayEffect base class in the new Blueprint class creation wizard. Pro-tip: when a new GE blueprint is created, It will open up with the Full Graph Editor. Reopen it to see only the Class Defaults window, as GEs are data-only blueprints.

GE_RestoreHealth class defaults
Let’s review the basic settings of the GameplayEffect class. Today we just focus on the basics which will allow you to create basic gameplay effects and modify attributes and control the logic of your prototypes, before diving into more depths.
Duration Policy - how long this GE should last, or should it be Instant like in our case. Imagine having a DoT in your MMORPG game or a cooldown on your special spell - select a Has Duration policy and specify a duration of the effect. In case of something like damage from bullets, grenades, or utility effects to alter character attributes, choose an Instant policy.
Modifiers - modifies target attributes. You can select any attribute you want to modify on the target of your GE, then choose how you would like to modify it. In our case we want to set health to maximum from any amount present, so select the Override option.
Magnitude Calculation Type - how an attribute change will be calculated. Here we will select Scalable Float where we can put a float parameter or select an appropriate data-table.
Grenade class
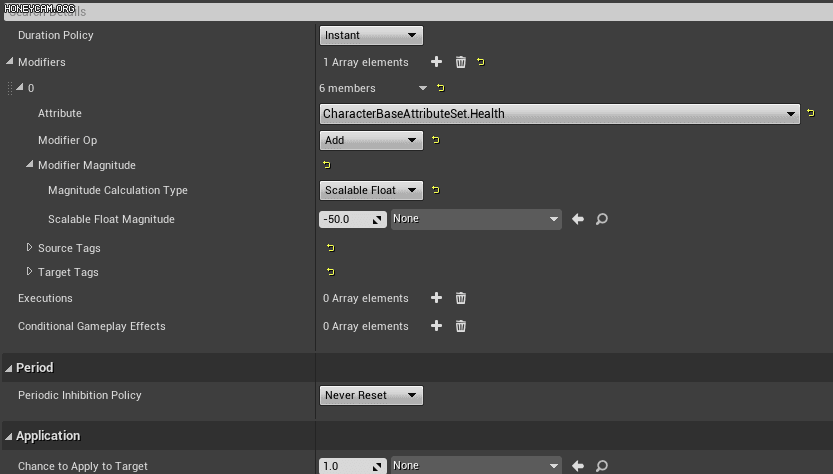
Now we understand how the gameplay effect class is working, we can create a GE_GrenadeInstantDamage class and use this damaging effect to all actors of class Third Person Character overlapped by the exploding grenade.

Here are simple GE settings to use, if you want instantly subtract 50 HP points from the target Health attribute.

GE_GrenadeInstantDamage
Is it possible to pass attribute changes to a GE from the grenade object? Yes!
What if instead of reading a float attribute from the gameplay effect class setup or using a separate table to store those values, you want to pass a modifier from a caller class. For example, there is a calculation you need to perform inside your actor class, instead of using hardcoded values or tables. Another good case is simply passing the data between otherwise unrelated/unreferenced actors using the gameplay effect. But in that case, we are limited only to our attribute values, of course. There are two options: using a dedicated calculation class. or setting magnitude "by caller".
For this, we need to create a Data Tag - an identifier, which then we use to forward the magnitude set by the caller to the right attribute. Go ahead and add 'DataTag.Health' and assign it in the Set by Caller selected calculation type.
Now if you open a BP_Projectile in the SimpleGAS project, you will see this option to apply damage by creating a GameplayEffectSpec first, and then set how much health we want to subtract by providing a Magnitude length and the Data.Tag linked to the Health attribute.

You can use either ApplyGameplayEffectTo_ or ApplyGameplayEffectSpec for your needs depending on the type of the gameplay effect and the way you're willing to modify attributes.
Networking 101
Let's touch on the basics of Networking in the Unreal. Each Actor can be replicated from Server to Clients if we select the Replicates option.

On actor event Begin Play we want to set the projectile we can use a Switch Has Authority macro which has two execution pins: one for Server (Authority) and one for Client (Remote). When a new projectile is created, it will be created on both server and client. Using this macro we can disable the visibility of a projectile on the Server (so our owning player will see the local version of the projectile) and set a timer to execute an Explode event.

EventExplode_Multicast is the event that will be executed on a server and all owning clients.

On the Server, we are going through all actors overlapped by the sphere collision component and apply a damaging effect through ApplyGameplayEffectTo_ or ApplyGameplayEffectSpec to each actor.

On Remote client, we Spawn explosion emitter, play sounds and hide the projectile before it's being recycled.

An overview of the explosion and damage dealing logic in BP_Projectile. A rule of thumb is that damage-dealing logic should be executed on Authority, as a Server should make a final call in what numbers are applied to the damaged actors and replicate those changes through GAS. At the same time an explosion effect, sounds, and other visual feedback don't need to be created or invoked on the server and can be executed on clients.

To test that everything works correctly, open the Play In Editor options and choose the Net Mode: Play as Client. That will simulate launching the game as a client which connects to the remote server. Select the number of players to launch. That will open two windows to simulate 2 players connected to a server.

Conclusion
Here is the final result! I hope after reading both this and Part 1 you will be familiar with the basics of the Gameplay Ability System and can experiment with it in your projects, using the minimum required C++ setup and handling the Gameplay Effects, such as Damage, Healing, DoTs in blueprints. We just scratched the tip of the iceberg in GAS and if you'd like to see more tutorials on GAS, networking, or another topic, please follow me on the social platforms and leave comments on what you'd like to see next. Until next time!

Useful Links
SimpleGAS GitHub: https://github.com/dsavosin/SimpleGAS
Famous GAS Documentation by Tranek: https://github.com/tranek/GASDocumentation