TL;DR
Using a custom build script in Node JS, it is possible to manipulate a series of Sketch files, and then, using an internal Sketch tool, automatically export their assets, to generate multiple icon libraries, for multiple platforms and different brands, that support dynamic colourisation of the assets via design tokens, and also AB testing of the assets via naming convention. Easy peasy :)
Well, actually it’s not that easy, but it can certainly be done. This post is a detailed explanation of how we did it, and what we discovered along the way.
The problem we were trying to solve
At Badoo we build a dating app. Actually, multiple dating apps. For multiple platforms (iOS, Android, Mobile Web, Desktop Web), across multiple teams.
We use hundreds of icons in our apps. Some of them are the same across different apps, some are very specific to the brands the apps reflect. The icons are continuously evolving, in sync with the evolution of the design. Sometimes completely new icons are added, while others get updated, and still others get dropped (although, they often remain in the codebase).
Our design team designs and maintains the icons, and until now the only way for them to provide the correct assets to the different teams, platforms and apps, was to send them via email, chat or dropbox. This is not only time-consuming, but but it’s almost always prone to error. In fact, we found that errors occurred every time (we’re human!): icons would be updated on one platform but not on another; or icons would be missing or in the wrong format or size. So, there was a constant back and forth between designers and developers; developers would export icons directly from the Sketch file, and the icons would get added to the codebase but with no check to see if similar icons already existed (and were available for reuse). I’m sure you know what I am talking about.
At Badoo we have a Design System, called Cosmos, and recently we introduced a library of Design Tokens across multiple platforms (Mobile Web, Android and iOS) both for our main app and its white-labels. Essentially, we are now able to communicate design decisions (like the border of a button, the background colour of a particular feature page, the font size of the Heading 1, or the duration of an animation for a popup) using elementary design values, all processed and delivered automatically to all the apps, and all the platforms consuming these design tokens in their apps.
How we are now able to transform a design idea, like for example a change of a colour, to real code in production, in just a few clicks and hardly any time at all, has really impressed product managers and designers alike.
So, their next question (and request) was: can you do something similar for the assets? And our answer was: yes, we (probably) can!
It was quite a leap of faith at the time, I have to admit. We had some ideas of how to do it, but we were not at all sure if it was technically doable, with all the restrictions we operate under. We agreed to start with an MVP project, but by the end everything had gone so well that it became our final product, with all the necessary features.
The requirements
The requirements for the MVP were very clear: create a pipeline that could take a Sketch file and export all the icons included in the file, in different formats, for different platforms, with each icon suitable for use in AB testing.
This is complicated because, in our products, one icon can have many different colours and/or different shapes for different brands/white-labels (although the codebase of the app is the same, as well as, the name of the icon).
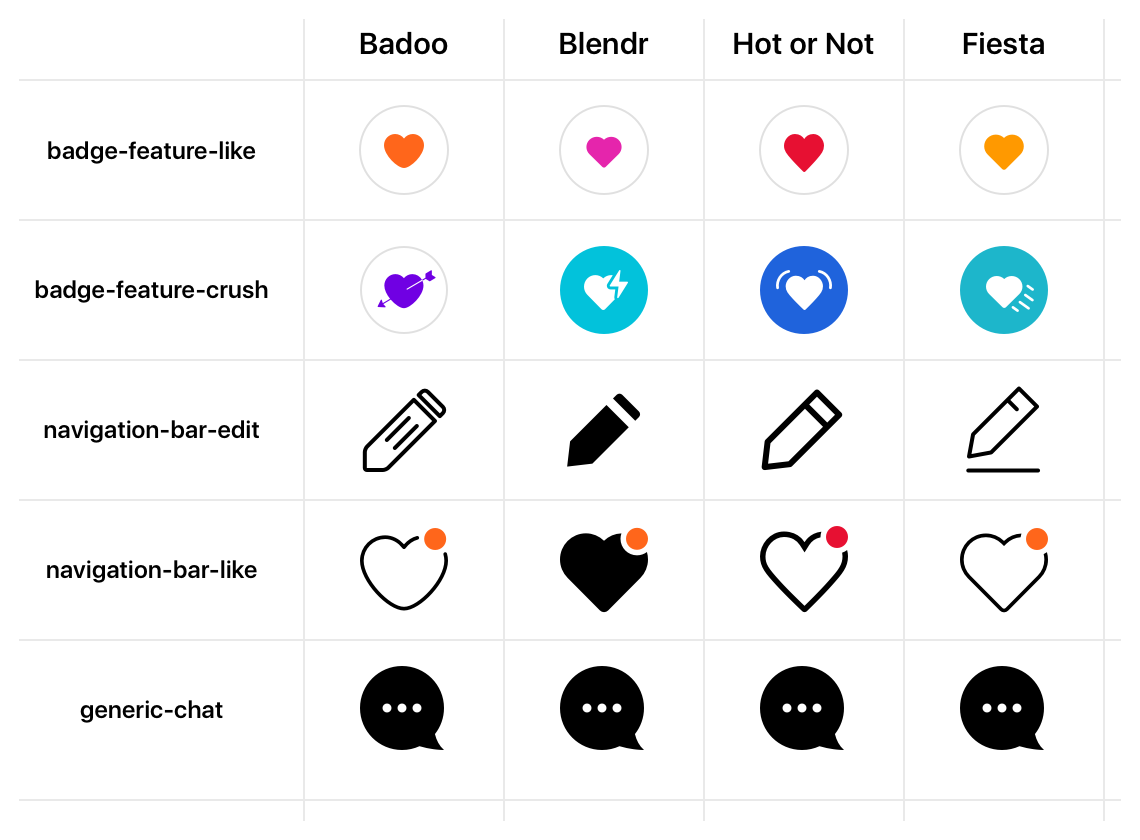
Look at some of the icons used in our applications and you will notice that some are identical, some are very similar to each other but for a few details, while others are quite different, both in their shapes and colours:

A comparison of the icon for the different brands
Now, the colours used in the icons are not just plain colours, but match the exact colours stated in the design tokens for that brand and its specific features:

Comparison of the colours across different brands. The colour values are specified as design tokens.
So, our aim with this new assets pipeline was not only to automate the process of generation and delivery of the icons, for all the different platforms and brands, but rather to be able to «dynamically» colour the icons according to the brand/white-label.
Sketch and sketchtool
Sketch is the main design tool that our design team uses. Even though we did consider other options (Figma, mainly), we knew that Sketch was the format of the source files we were going to be using for this project (simply because it’s the tool our designers are more proficient in, and it’s the format of the files where the existing icons/assets are used, among other reasons).
The fact is that, at the beginning of the project we were not even sure what final formats the platforms were expecting. In our minds, the process was going to be pretty basic like this: export the icons in SVG format from the Sketch file and then consume the SVG files in Mobile Web and Android, and for iOS find a library that can convert SVGs to PDFs. And that’s it. That was the plan when we started, although we had no idea if it would work, or about the unknown unknowns we might encounter (hence, the MVP to see if it was even feasible, and, if so, how much effort it might entail).
I don’t know if you have ever worked with «PDF converters» but in my experience they are generally a pain. They «almost» do the job, but never to the 100% you really need. So, in the back of my mind, I felt we were treading a dangerous path.
Sketch has a way of exporting assets that is pretty much perfect, I’ve never had a problem with it (be it SVG, PDF, or other formats). So I wanted to see if there were any other ways to interact with Sketch, to use its engine to export assets directly via Sketch, possibly in a programmatic way (I was also wondering if a custom plugin could be built, although that would have meant a lot of work for me, not only because I have zero experience in that field!).
I knew that internally Sketch is no more than a zip file (if you rename a .sketchfile to .zip, double-click to uncompress it, and open the resulting folder, you see a list of JSON files, and a bitmap used as preview):

Inner structure of a Sketch file, once uncompressed
So, I started to explore the different JSON files, trying to understand the connections and dependencies between them.
I realised that somehow, despite the JSON files being deeply nested (and quite large!), the relations between the different entities inside their objects is not too complicated: you have pages, artboards and layers; inside the layers you have the paths, and you can have shared styles between them; each one of these entities has a unique ID that is used to keep a reference between the different files; and all the «page» objects are saved in JSON files, stored in a sub-folder called pages, with the ID of the page used as name of the file.
One significant discovery I made, during this exploration, was that the names of the layers, pages, and styles are just labels, and they can be changed at any time, without compromising the inner workings of the Sketch file. The thing that matters is the unique ID assigned to them, and this is never exposed to the end user (although, can be read and referenced inside the JSON files). Here is an example of how the unique ID of a style looks like:
{
 "_class": "sharedStyle",
 "do_objectID": "49BA4E98-8D63-435C-81D9-E2F6CDB63136",
 "name": "name-of/the-style",
 "value": {
     "_class": "style",
     "endMarkerType": 0,
     "fills": [
         {
             "_class": "fill",
             "isEnabled": true,
             "color": {
                 "_class": "color",
                 "alpha": 1,
                 "blue": 0.7176470588235294,
                 "green": 0.4627450980392159,
                 "red": 0
             },
             "fillType": 0,
             "noiseIndex": 0,
             "noiseIntensity": 0,
             "patternFillType": 1,
             "patternTileScale": 1
         }
     ],
     "miterLimit": 10,
     "startMarkerType": 0,
     "windingRule": 1
 }
}
This gave me an idea: that maybe we could use specific conventions on the names of the artboards and of the pages, to declare some kind of meta-information about the relations between the different assets, and use them programmatically at build time.
Sketchtool
At this point, by the end of the initial explorations, the plan had changed from «let’s export the icons in SVG and then convert them» to «let’s build a plugin that, within Sketch, allows us to directly export the icons in their final format». But even then, the plan was still very blurred (and the technical feasibility was still uncertain).
It was while I was looking at existing plugins, specially at their source code, to see if and how they might interact with the Sketch export APIs, that I came across a tool that I’d never heard of before: Sketchtool.
Sketchtool is an official Sketch tool (official as in: developed by Bohemian Coding), which according to the documentation:
… is a command line utility that’s bundled with Sketch, that allows you to perform some operations with Sketch documents, like inspecting them or exporting assets. It also lets you control Sketch from the command line to perform some actions (like running plugins, for example).
Hang on… a command line utility to perform operations like exporting assets? Just, what I was looking for! Also, being an official tool, there wouldn’t be any problems of versions, obsolescence, maintenance, etc.
I started to look into it immediately, and read the documentation, which amounted to just a single page on the Sketch website (I’ve found hardly any other resources or pages about it out there, so it’s understandable that I’d never heard of it)
Sketchtool is bundled directly with Sketch, and you can find it inside Sketch at this path:
Sketch.app/Contents/Resources/sketchtool/When you launch it in your CLI with the command:
$ /Applications/Sketch.app/Contents/Resources/sketchtool/bin/sketchtoolthis is the output you see on your terminal (I have simplified it a little):
Usage: sketchtool <command> [<args>]
 [--formats=<string>]
 [--use-id-for-name{=YES|NO}]
 [--export-page-as-fallback{=YES|NO}]
 [--serial{=YES|NO}]
 [--context=<string>]
 [--application=<path>]
 [--without-activating{=YES|NO}]
 [--item=<string>]
 [--items=<string>]
 [--safemode{=YES|NO} | --no-safemode | -S {<YES|NO>}]
 [--max-size=<float> | -m <float>]
 [--background=<string> | -g <string>]
 [--compression=<float> | -c <float>]
 [--new-instance{=YES|NO}]
 [--reveal{=YES|NO}]
 [--timeout=<float>]
 [--include-symbols{=YES|NO}]
 [--bounds=<rectangle>]
 [--outputJSON=<path>]
 [--filename=<string>]
 [--wait-for-exit{=YES|NO}]
 [--scales=<path>]
 [--overwriting{=YES|NO}]
 [--group-contents-only{=YES|NO}]
 [--trimmed{=YES|NO}]
 [--help]
 [--progressive{=YES|NO}]
 [--save-for-web{=YES|NO}]
 [--output=<path>]
Commands:
dump               Dump out the structure of a document as JSON.
export artboards  Export one or more artboards
export layers     Export one or more layers
export pages      Export an area from one or more pages
export preview    Export a preview image for a document
export slices     Export one or more slices
help              Show this help message.
list artboards    List information on the document's artboards.
list formats      List the supported export formats.
list layers       List information on all of the document's layers.
list pages        List information on the document's pages.
list slices       List information on the document's slices.
metadata          List the metadata for a document.
run               Run a command from a plugin, inside Sketch.
show              Show the location of the various sketch folders.
See ‘sketchtool help <command>’ for more information on a specific command.
As you can see, the tool has four main functions: to read/dump the metadata of the internal JSON files; to list the entities inside a file; to export these entities; and to run a command exposed by a plugin. In addition, each command has a lot of options available. In the case of the export command, almost all the options you find in the export panel are also available via Sketchtool’s command line:

«Export» panel in Sketch, with the available options
This means that Sketch can be used directly as export «engine» via sketchtool, without the need for external converters (from SVG to PNG or PDF, for example). Big deal!
A quick test using sketchtool and a simple Sketch file with a few icons inside, confirmed all the initial suppositions: just by using this simple tool, we can avoid both using third-party exporters and building our own custom exporters: Sketch does it all!
The Sketch file(s)
Once we knew that Sketch was the tool we were going to use, for both storing and exporting the icons, it was time to actually collect the icons used in our applications into a Sketch file.
Initially, we only planned to work with a limited set of icons, those for the MVP project, but we quickly realised that it would have been better to collected them all at once, to be able to immediately spot duplicates, inconsistencies, any omissions, etc.
Our designers did an incredible job and in just a couple of days a large part of the assets used in their Sketch files has been collected and organised into a single file. At this point, the Sketch file looked like this:

Overview of the Sketch file containing the icons used in our application.
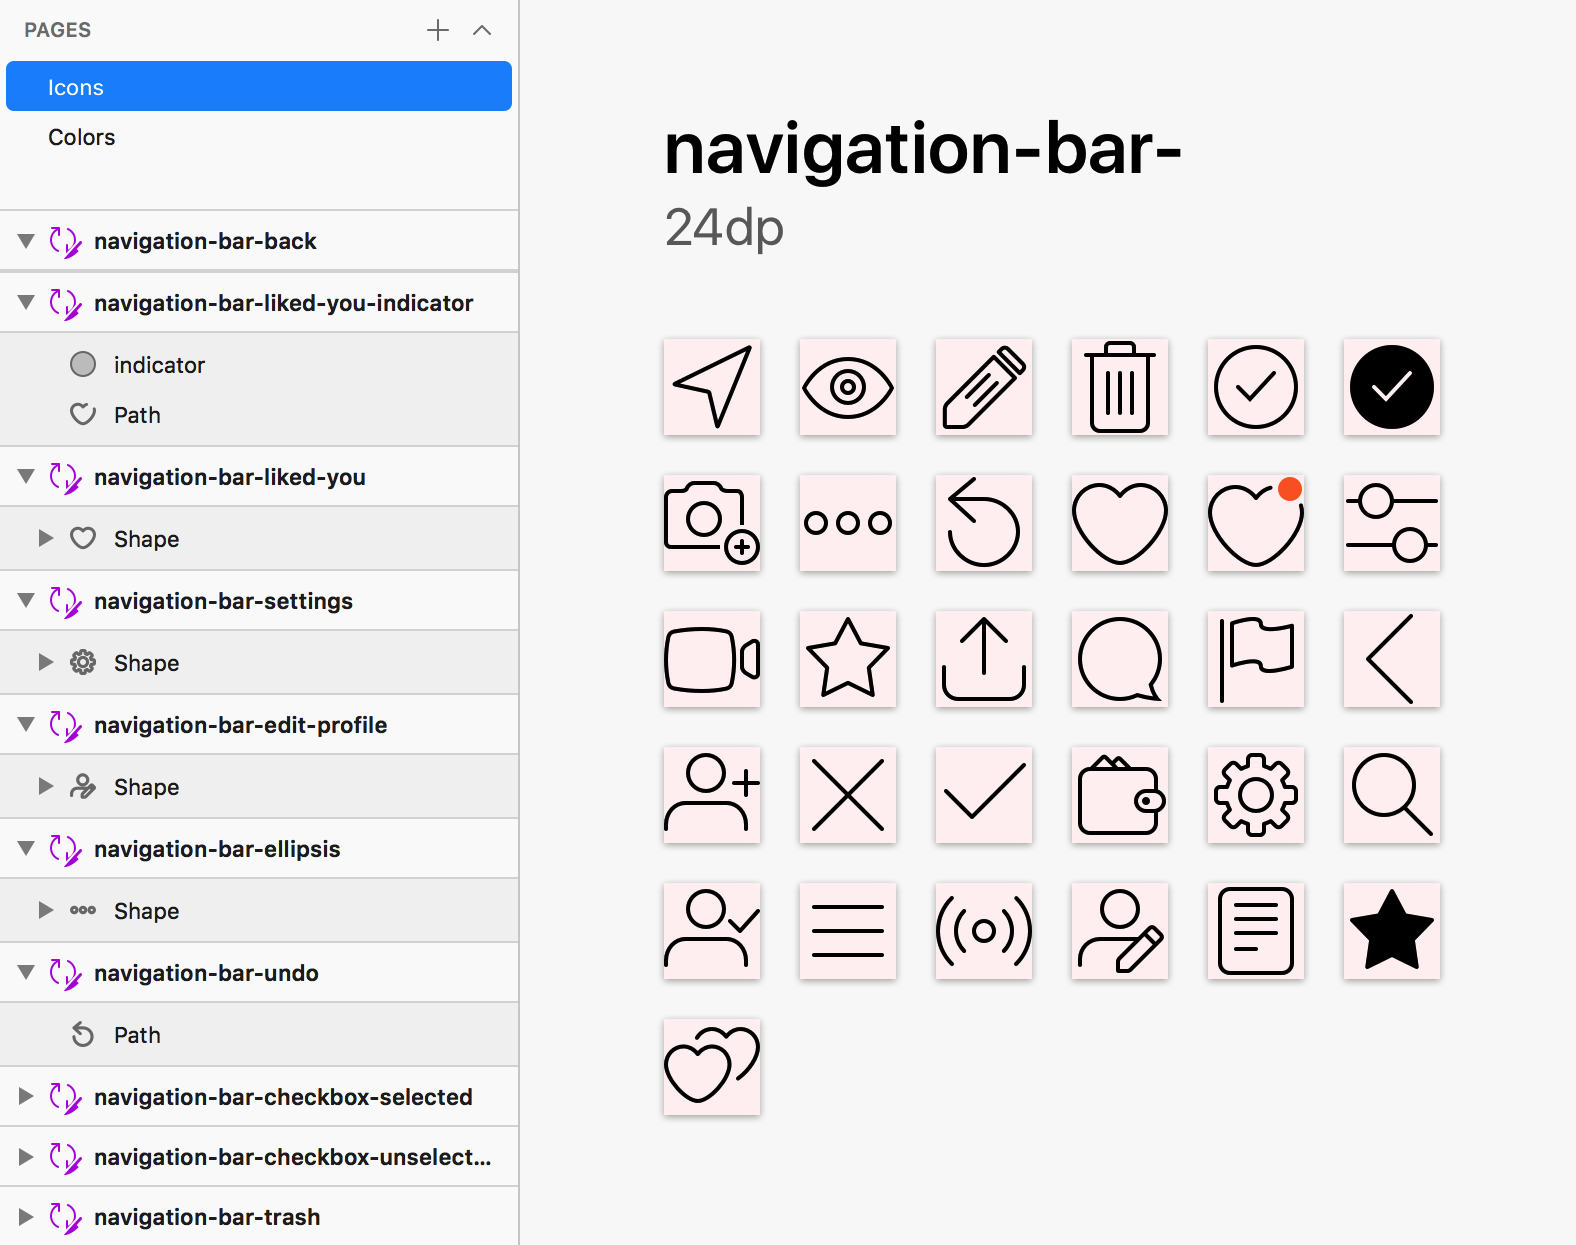
In the file, each icon has its own artboard, named with the desired name of the icon (later to be used by Sketch as file name when exporting the assets).
All the paths are converted to outlines, and the combined paths (generally as union or subtraction) are flattened to a single shape. This ensures that the generated assets maintain the perfect visual appearance they have in the source file, and optimum compatibility with the various platforms.

Example of how the icons (and their layers) are organised in the assets Sketch file. The light pink background applied to the artboards creates a visual contrast with the white areas.
Dynamic colouring the icons with Shared Styles (and Design Tokens)
Once we had collected the icons, the next step was to apply the right colours to them. What we did was create a set of pre-defined Shared Styles in Sketch, with names that matched those of the design tokens used in our design system, and then use them to apply colours to the icons.
This is how a style is applied to a layer:

Layer in Sketch with a pre-defined style (fill color).
And this is how the styles are declared and then applied to an element:

How we have decided to organise the styles in Sketch
The naming convention is very important here. The designers can organise the styles in any sub-folders, providing the name of the style itself matches the name of the corresponding design token for that colour. This is, so it can be referenced programmatically by the build script later on.
Pages and artboard names used for AB testing
At this point, it was time to understand how to ensure the designers would be able to carry out AB testing on the icons. Once again, in the end we decided to rely on naming conventions (big fan of K.I.S.S. here).
In this case, we used the page names to detect when a set of icons was an AB test/experiment (using "XP_" as prefix) and the artboard names to detect which asset the AB test was referring to, and its different variants (enclosed within square brackets).

How the naming convention on pages and artboards is used to «declare» an AB test. Notice: the icons are just a examples created especially for testing purposes, they are not real icons used in a product :)
The names used for the tests and the variants are not generic names: they must match the unique-name-IDs assigned to the experiments/variants in our internal user-split tool. In this way, the assets can later be correctly associated with the correct AB test user group.
Multiple files for multiple brands
The last piece of the puzzle was: how do we support different shapes of the same icon, for different brands?

This was a very important requirement for the product managers, and we had various options available to use. At first, we thought of using different pages in the same Sketch file, with different page names for each brand; but soon we realised it would made it much more complex and more difficult for the designers to keep the icons in sync between the different brands. So we concluded that the solution was to have multiple files: a «common» file, where we stored all the icons that were identical for the different brands, and brand-specific files for icons that were overriding the «base» icons in the common file.

At this point the Sketch files were ready. We were ready to start writing code.
To be continued.

