Привет! Меня зовут Андрей Шоколов, я Android-разработчик KODE.
К нам обратилась компания Forward Leasing с запросом разработать мобильное приложение по готовому дизайну. Прототип содержал дугу, которая по задумке должна была сжиматься в одну линию при скролле. За основу решили взять CoordinatorLayout: у нас уже был положительный опыт работы с ним на другом проекте. Ещё в нашей команде часто любили соревноваться, какой же Layout лучше — CoordinatorLayout или MotionLayout, и именно сейчас настало время узнать.
Сейчас я понимаю, что проблема была создана на ровном месте, — но это я выяснил только в процессе работы. В статье расскажу, с какими 7 сложностями CoordinatorLayout я столкнулся и как сделать за полчаса то, с чем я провозился сутки.

Задача проекта
Мне нужно было создать AppBarLayout с дугой, который скроллится в одну линию. Функциональность добавлялась в существующую Activity приложения Forward. Корневым элементом для главной Activity был выбран CoordinatorLayout — это ViewGroup, целью которой является координация внутренних view-элементов.
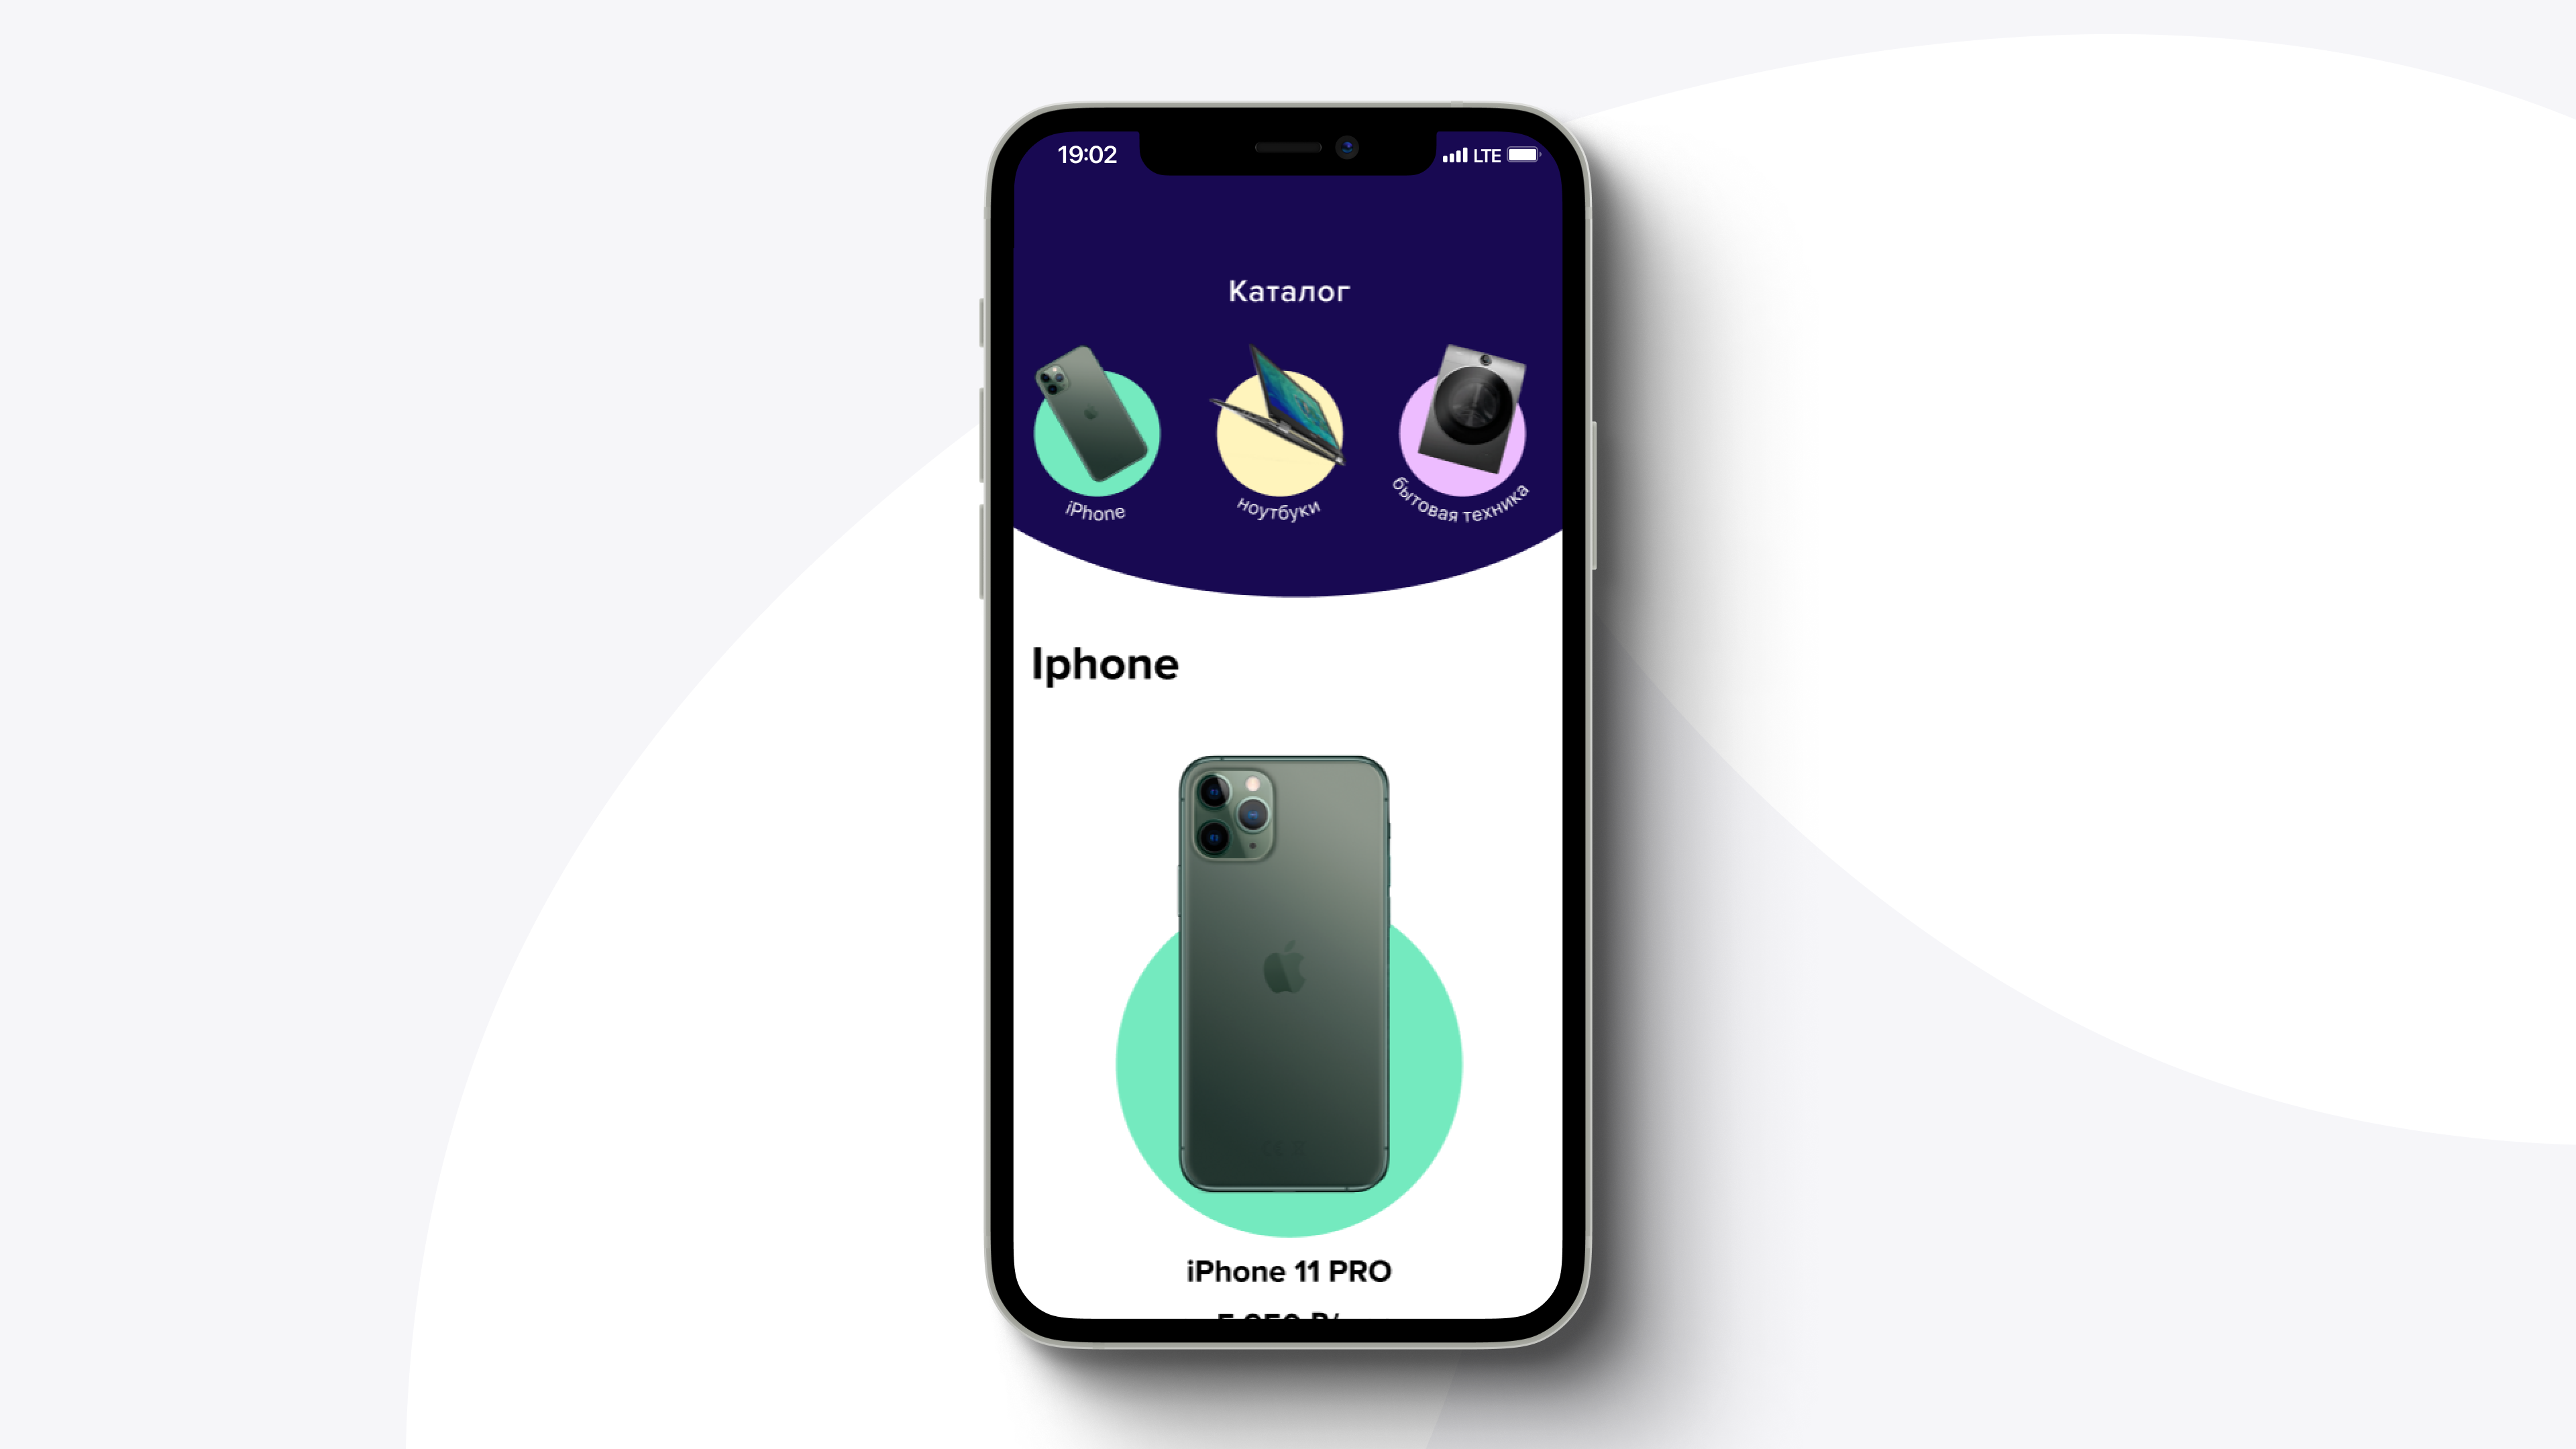
Прежде чем я расскажу, что такое CoordinatorLayout и с какими сложностями в реализации я столкнулся, покажу, как в итоге должно было получиться:
Финальный результат

Что такое CoordinatorLayout с Default behavior
CoordinatorLayout — это просто обычный FrameLayout. Нет, простите: как написано в документации, это super-powered FrameLayout!
С помощью Behaviors можно управлять дочерней View. Думаю, все видели эти красивые анимации, когда снизу выплывает Snackbar, а вместе с ним вверх поднимается FAB (Floating Action Button). Всё работает отлично. Но именно Behaviors и подставят меня позднее, потому что когда тебе нужно делать не всё по дефолту, а добавлять что-то своё, то возникают некоторые сложности. Для реализации такой дуги был создан класс RoundedAppBarLayout, наследующий AppBarLayout.
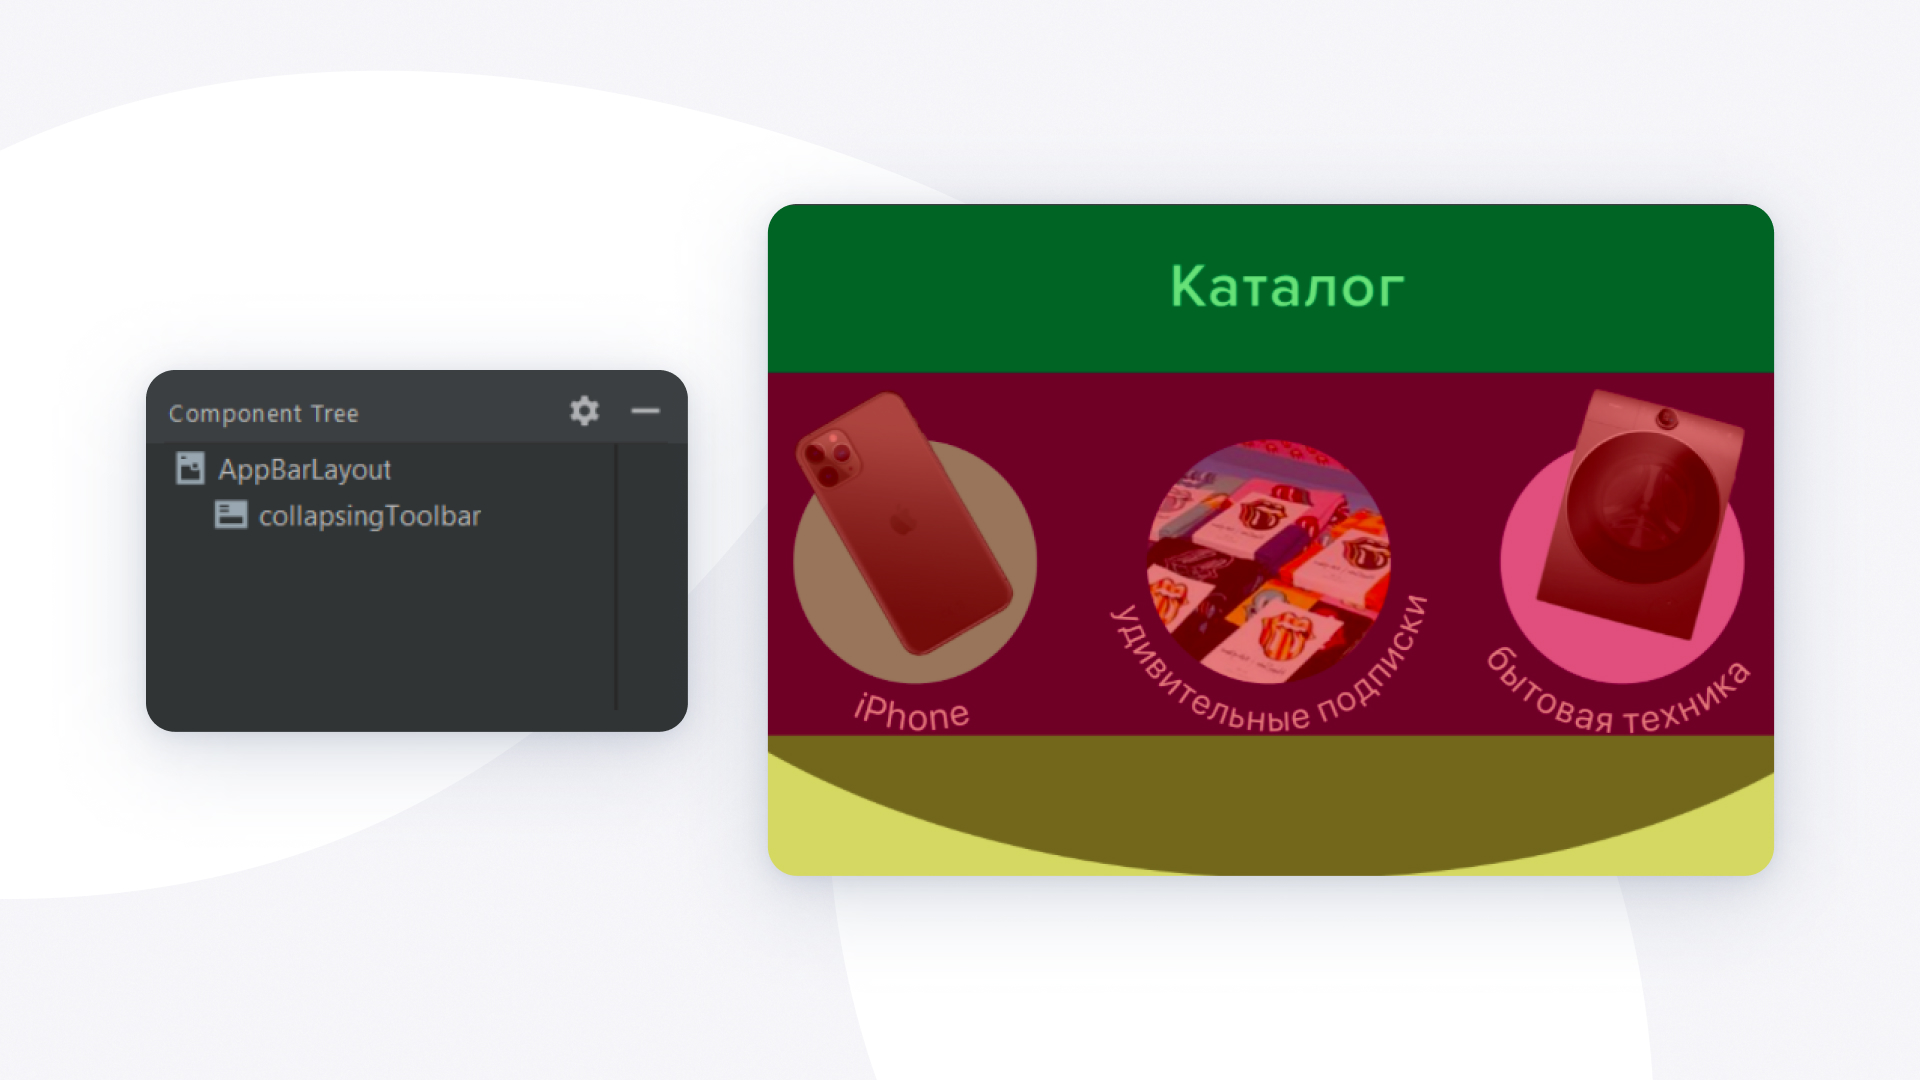
Что дано в RoundedAppBarLayout
Toolbar — самая обычная вью тулбара из Android.
ContentView, где может быть всё, что угодно.
Arc — наша дуга.

С какими сложностями я столкнулся и как их решал
№1. Скроллинг
У нас есть RoundedAppBarLayout, в котором находятся Toolbar, ContentView и Arc. Для каждого элемента вью внутри него можно задать scrollFlags, которые описывают поведение вью при скролле: scroll, snap, expandAlways, expandAlwaysCollapsed, exitUntilCollapsed. Как они работают? AppBarLayout проходится по всем дочерним вью — child’ам, которые у него есть, и смотрит: если выставлен scroll, тогда добавить то, что эта вьюшка скроллится, если noScroll — return.
Если на Toolbar написано scroll, то он прокрутится, а всё, что находится ниже него, — нет. Соответственно, если поставить scroll на Toolbar и ContentView, то прокручиваться будут только они. Нам же нужно ровно наоборот: чтобы скроллилась дуга, а не всё, что выше неё.
Решение
CollapsingToolbar. Он позволяет оставить Toolbar наверху и даёт возможность прокручивать ContentView, Arc и содержимое ниже. Это решение работает достаточно хорошо, за исключением того, что Toolbar должен быть всегда последним элементом CollapsingToolbar.
Код
<?xml version="1.0" encoding="utf-8"?>
<merge xmlns:android="http://schemas.android.com/apk/res/android"
    xmlns:app="http://schemas.android.com/apk/res-auto"
    xmlns:tools="http://schemas.android.com/tools"
    android:layout_width="match_parent"
    android:layout_height="wrap_content"
    android:background="@color/transparent"
    tools:parentTag="com.google.android.material.appbar.AppBarLayout">

    <com.google.android.material.appbar.CollapsingToolbarLayout
        android:id="@+id/collapsingToolbar"
        android:layout_width="match_parent"
        android:layout_height="wrap_content"
        android:background="@color/transparent"
        app:layout_scrollFlags="scroll|snap|exitUntilCollapsed">

    </com.google.android.material.appbar.CollapsingToolbarLayout>
</merge>
№2. Прозрачные зоны в Arc и отрисовка дуги
Для того чтобы нарисовать дугу в AppBarLayout, в блоке Arc должны находиться зоны, которые будут прозрачными. Поэтому выставляем AppBarLayout transparent, как и ContentView: мы не знаем, какого цвета он должен быть.
Но если мы оставим CollapsingToolbar, который вложен в AppBar, без цвета, как и наш ContentView, то на выходе мы получим прозрачный прямоугольник.
Решение
Покрасить CollapsingToolbar в какой-то цвет. Мы выбрали фиолетовый, так как это основной цвет проекта. Этим решением мы также улучшили анимацию: теперь при прокрутке блок может затемняться, и это выглядит достаточно красиво.
Как это выглядит

Остаётся вопрос с дугой. Мы не можем поместить её в в CollapsingToolbar, потому что он имеет свой цвет, а Arc должна быть transparent. Получается, мы должны поместить дугу в AppBarLayout, но он, как мы помним, не даёт скроллить всё, что внизу.
Решение
Рисовать на канвасе и во время скролла просчитывать, как рисовать дугу.
Элемент нужно добавить в CollapsingToolbar. Можно было бы сразу добавить сюда Toolbar, но так как нужно, чтобы он был последним элементом в CollapsingToolbarLayout, его приходится записывать отдельно. То есть я делаю Inflate Layout’а и добавляю в конец CollapsingToolbarLayout.
Код
private fun addContentView(){
        if (childCount > 1) {
            val contentChild = this.getChildAt(1)
            removeView(contentChild)

            val layoutParams = CollapsingToolbarLayout.LayoutParams(contentChild.layoutParams)
            with(contentChild) {
                layoutParams.setMargins(
                    marginStart,
                    marginTop + toolbarHeight,
                    marginEnd,
                    marginBottom
                )
            }
            contentChild.setBackgroundColor(context.getColor(R.color.accent2))
            contentChild.layoutParams = layoutParams

            collapsingToolbar.addView(contentChild)
        }
    }

    override fun onFinishInflate() {
        super.onFinishInflate()
        addContentView()

        val toolbar = LayoutInflater.from(context)
            .inflate(R.layout.toolbar_default, collapsingToolbar, false)
        removeView(toolbar)
        collapsingToolbar.addView(toolbar)
    }
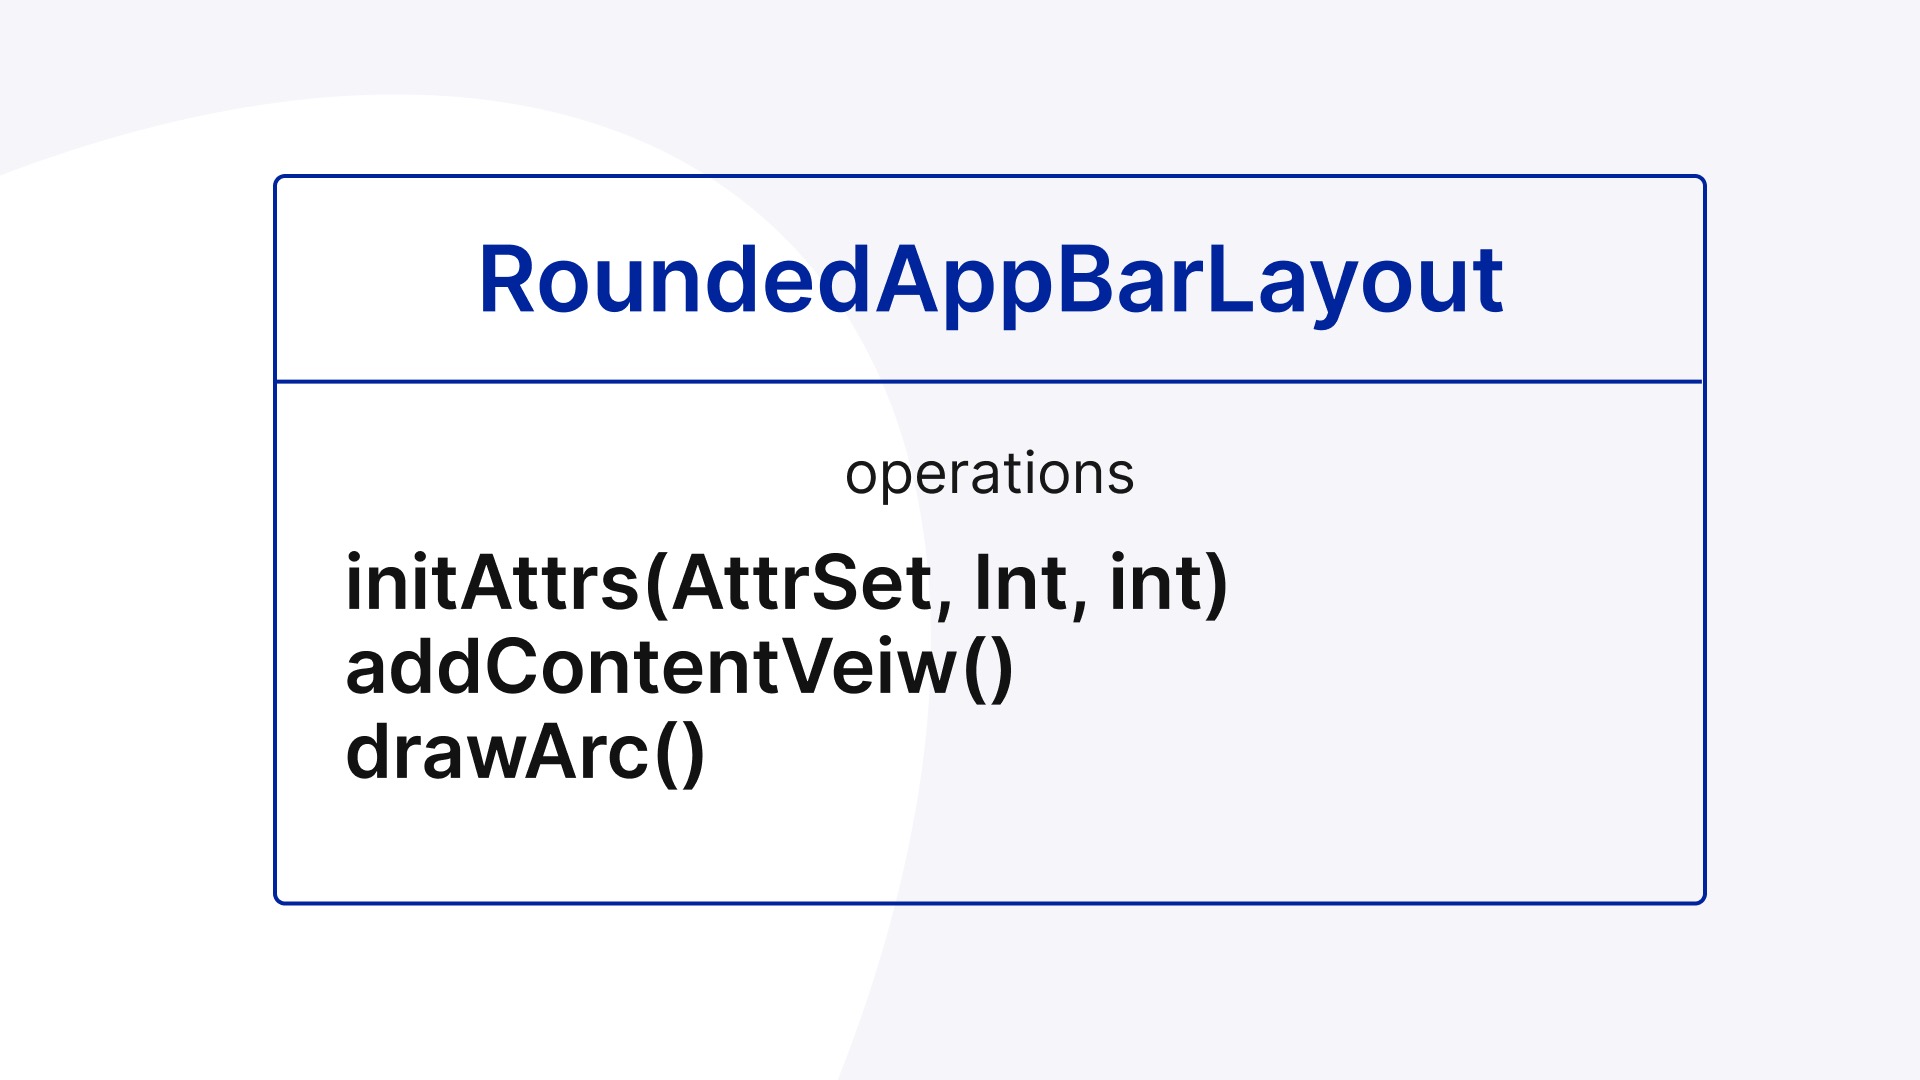
В итоге получился такой простенький класс, где есть атрибуты, title, где можно задать иконку для Toolbar, добавить ContentView, который находится в самом нашем RoundedAppBarLayout, и нарисовать дугу.
№3. Пустое пространство после ContentView
С чем столкнулись дальше. После Toolbar и ContentView у нас нет никакого пространства. По идее, туда нужно было бы добавить вьюшку, но вместе с ней при скролле появлялась бы белая полоса. Я заранее ожидал такое поведение.
Решение
Расширение AppBarLayout. Также сохраняю appbarBottom, чтобы нарисовать дугу: сохраняю нижнюю координату ContentView и увеличиваю AppBarLayout до конца блока Arc. Так нам будет удобнее рисовать. (Спойлер: это решение в итоге со мной сыграет злую шутку.)
Расширяю AppBarLayout
class RoundedAppBarLayout @JvmOverloads constructor(
    context: Context,
    attrs: AttributeSet? = null,
    defStyleAttr: Int = 0
) : AppBarLayout(context, attrs, defStyleAttr) {

    init {
        LayoutInflater.from(context).inflate(R.layout.appbar_rounded_default, this, true)
        initView()
    }

    private fun initView() {
        this.post {
            layoutParams = CoordinatorLayout.LayoutParams(width, height + arcHeight)
            appbarBottom = height.toFloat()
            appbarHalfWidth = width / 2f
        }
    }
}
Добавляю ContentChild и Toolbar для нормального отображения контента
    override fun onFinishInflate() {
        super.onFinishInflate()
        if (childCount > 1) {
            val contentChild = this.getChildAt(1)
            removeView(contentChild)

            val layoutParams = CollapsingToolbarLayout.LayoutParams(contentChild.layoutParams)
            with(contentChild) {
                layoutParams.setMargins(
                    marginStart,
                    marginTop + toolbarHeight,
                    marginEnd,
                    marginBottom
                )
            }
            contentChild.setBackgroundColor(context.getColor(R.color.accent2))
            contentChild.layoutParams = layoutParams

            collapsingToolbar.addView(contentChild)
        }
Рисую дугу
private fun drawArc(canvas: Canvas) {
        val scale = bottom / height.toFloat()

        arcPath.apply {
            reset()
            moveTo(0f, appbarBottom)
            quadTo(
                appbarHalfWidth,
                //divide by 2 due to arc drawing logic
                (appbarBottom + (arcHeight * 2)) * scale,
                width.toFloat(),
                appbarBottom
            )
        }
        canvas.drawPath(arcPath, arcPaint).apply {
            invalidate()
        }
    }
Нужно просчитать расстояние, когда AppBarLayout полностью заскроллен и недоскролен. То есть scale = 1 — это AppBarLayout раскрыт полностью, а scale = 0 — схлопнут. И рисую саму дугу. Я столкнулся здесь с очень интересной логикой: если указывать по y-координате, что крайняя точка дуги должна быть на 48 пикселях, то вершина этой точки будет на 24 пикселях — в два раза меньше. В итоге нужно домножать на два — решил я, не разобравшись с причиной.
Сейчас, во время написания статьи, я понимаю, что использовал функцию, которая рисует не дугу, а кривую Безье. И она строится не через крайнюю точку, а посередине. Вместо Path можно использовать Arc. Реализация останется той же, только без домножения на 2.
Весь код класса AppBarLayout
class RoundedAppBarLayout @JvmOverloads constructor(
    context: Context,
    attrs: AttributeSet? = null,
    defStyleAttr: Int = 0
) : AppBarLayout(context, attrs, defStyleAttr) {

    private var appbarBottom = 0f
    private var appbarHalfWidth = 0f

    //region toolbarArc
    private val arcHeight = DimensUtils.convertDpToPixel(48f, context)
    private val toolbarHeight = DimensUtils.convertDpToPixel(56f, context)

    private val arcPaint = Paint().apply {
        color = context.getColor(R.color.accent2)
        style = Paint.Style.FILL
        isAntiAlias = true
    }
    private val arcPath = Path()
    //endregion

    init {
        LayoutInflater.from(context).inflate(R.layout.appbar_default, this, true)
        initView()
    }

    override fun onDraw(canvas: Canvas) {
        super.onDraw(canvas)
        drawArc(canvas)
    }

    override fun onFinishInflate() {
        super.onFinishInflate()
        if (childCount > 1) {
            val contentChild = this.getChildAt(1)
            removeView(contentChild)

            val layoutParams = CollapsingToolbarLayout.LayoutParams(contentChild.layoutParams)
            with(contentChild) {
                layoutParams.setMargins(
                    marginStart,
                    marginTop + toolbarHeight,
                    marginEnd,
                    marginBottom
                )
            }
            contentChild.setBackgroundColor(context.getColor(R.color.accent2))
            contentChild.layoutParams = layoutParams

            collapsingToolbar.addView(contentChild)
        }

        val toolbar = LayoutInflater.from(context)
            .inflate(R.layout.toolbar_default, collapsingToolbar, false)
        removeView(toolbar)
        collapsingToolbar.addView(toolbar)
    }

    private fun initView() {
        setBackgroundColor(context.getColor(R.color.transparent))
        outlineProvider = null

        this.post {
            layoutParams = CoordinatorLayout.LayoutParams(width, height + arcHeight)
            appbarBottom = height.toFloat()
            appbarHalfWidth = width / 2f
        }
    }

    private fun drawArc(canvas: Canvas) {
        val scale = bottom / height.toFloat()

        arcPath.apply {
            reset()
            moveTo(0f, appbarBottom)
            quadTo(
                appbarHalfWidth,
                //divide by 2 due to arc drawing logic
                (appbarBottom + (arcHeight * 2)) * scale,
                width.toFloat(),
                appbarBottom
            )
        }
        canvas.drawPath(arcPath, arcPaint).apply {
            invalidate()
        }
    }
}
№4. Белая полоса при коллапсе
Только я порадовался, что всё хорошо работает, как внезапно обнаружился костыль в основном коде. Когда ты прокручиваешь экран, то буквально за пару пикселей до конца появляется белый прямоугольник.
Начинаешь разбирать — понимаешь, что это проделки Behavior c AppBarLayout. Так как я обновил ширину всего AppBarLayout (там теперь AppBarLayout и ширина нашей дуги), то когда он коллапсится, Layout смотрит, что AppBarLayout должен быть по высоте как Toolbar и дуга, поэтому выделяет место именно под такой размер.
Изначально я думал, что так как AppBarLayout имеет transparent background, то никаких проблем не будет, но когда AppBarLayout коллапсится, цвет background уже не играет роли.
Во время разработки я не понял, почему в AppBarLayout свободное пространство остаётся белым, а не transparent. В коде AppBarLayout я не смог найти этого. Возможно, это уже тонкости работы с CoordinatorLayout.
Решение
Я долго думал, как это исправить, и решил применить метод «инкостыляции». Он заключается в том, что я пишу свой кастомный Behavior, и когда он устанавливается в AppBarLayout, то я вызываю метод setRoundedAppBarBehavior. По сути я просто добавляю дополнительный margin, чтобы он мог отображаться поверх AppBarLayout.
Код
class RoundedAppBarBehavior(context: Context, attrs: AttributeSet) :
    AppBarLayout.ScrollingViewBehavior(context, attrs) {

    private var isInstalled = false

    override fun layoutDependsOn(
        parent: CoordinatorLayout,
        child: View,
        dependency: View
    ): Boolean {
        if (!isInstalled && dependency is BaseAppBarLayout) {
            isInstalled = true
            child.setRoundedAppBarBehavior()
        }
        return super.layoutDependsOn(parent, child, dependency)
    }
}

fun View.setRoundedAppBarBehavior() {
    if (this is ViewGroup) {
        val arcHeight = resources.getDimensionPixelSize(R.dimen.toolbar_arc_height)

        this.post {
            clipToPadding = false

            val lp = CoordinatorLayout.LayoutParams(layoutParams)
            lp.behavior = AppBarLayout.ScrollingViewBehavior()
            lp.setMargins(marginStart, marginTop - arcHeight, marginEnd, marginBottom)
            layoutParams = lp
        }
    }
}
Всё снова заработало, ура!
Как выглядит проблема и решение

№5. AppBar без контента не скроллится
Оказалось, что каждого AppBarLayout может быть контент внутри. И AppBarLayout думает: контента внутри меня никакого нет, так зачем мне скроллиться?
Решение
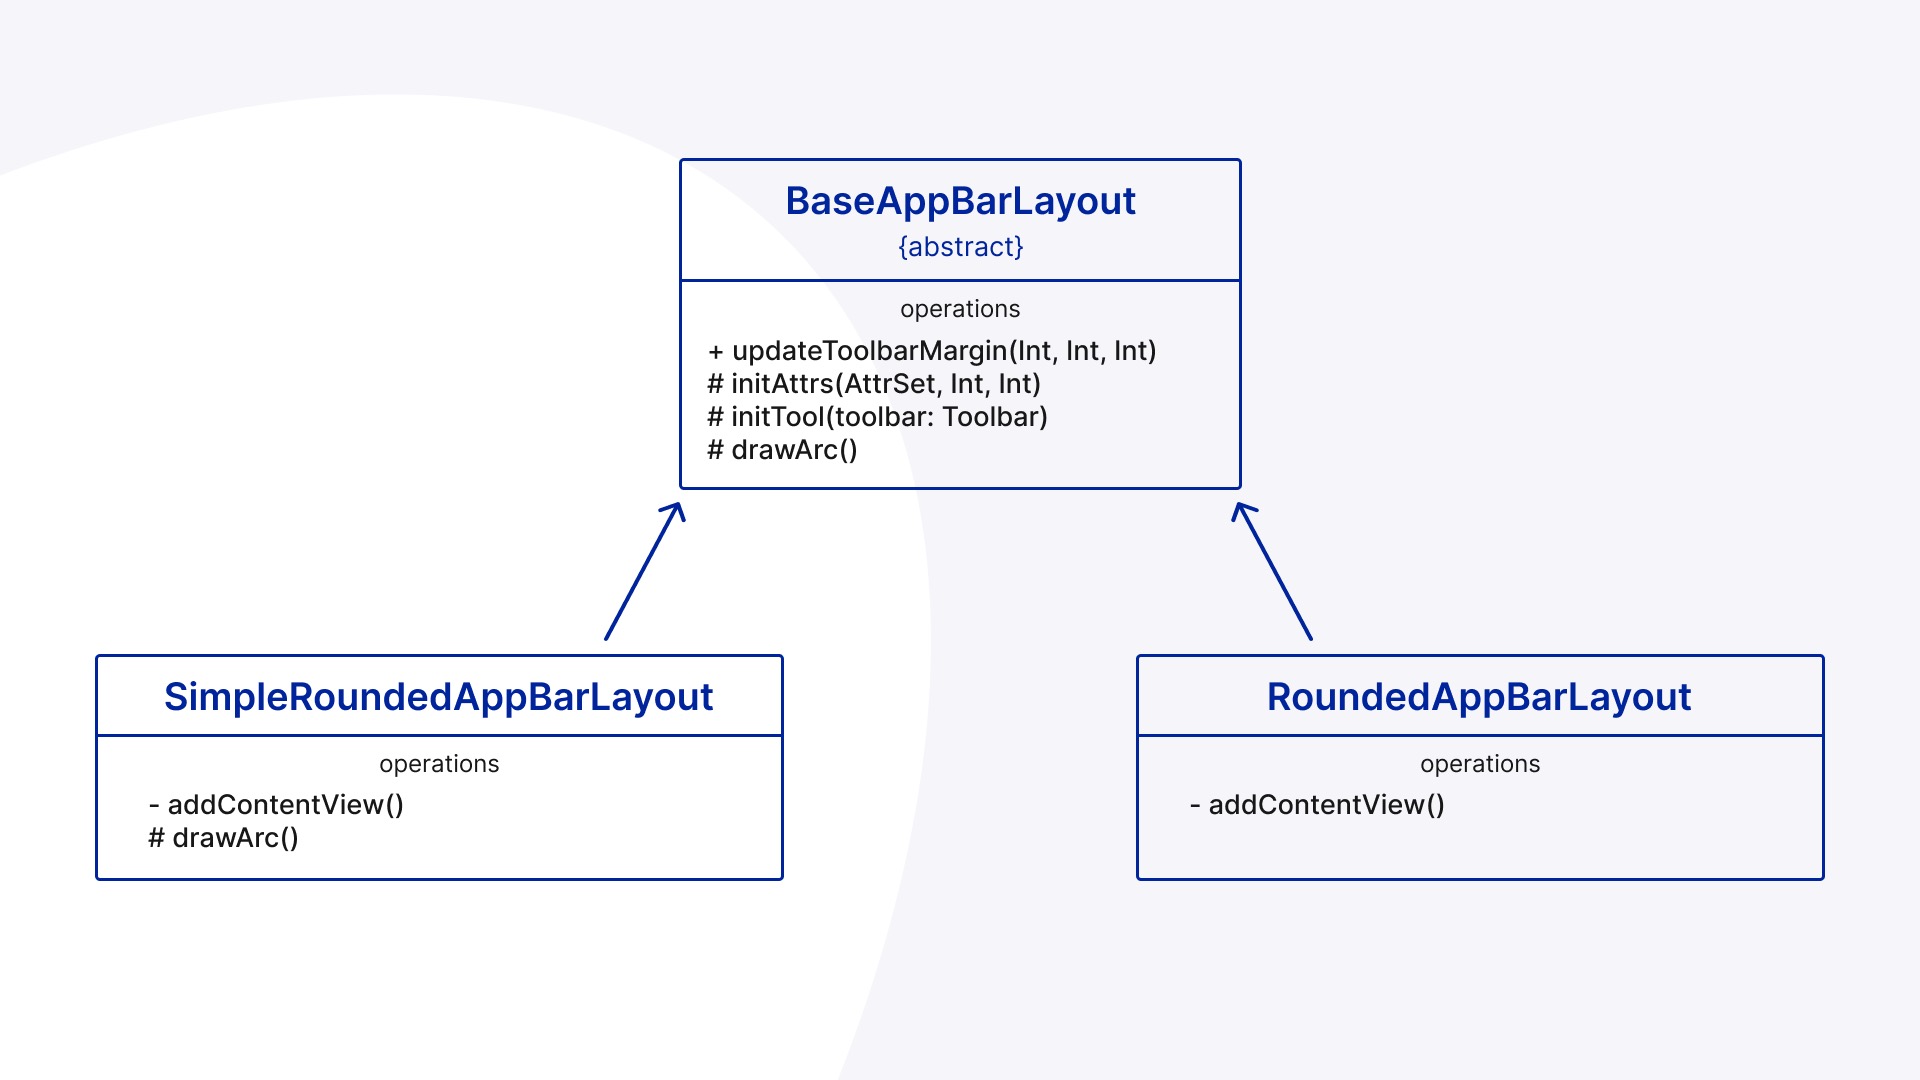
Разделение базового класса на два дочерних: RoundedAppBarLayour и SimpleRoundedAppBarLayout. В первый можно поместить контент, а второй останется без него.
Код базового класса AppBarLayout и 2 наследуемых SimpleRoundedAppBarLayout и RoundedAppBarLayout
abstract class BaseAppBarLayout @JvmOverloads constructor(
    context: Context,
    attrs: AttributeSet? = null,
    defStyleAttr: Int = 0
) : AppBarLayout(context, attrs, defStyleAttr) {

    var title: String? = null
        set(value) {
            field = value
            titleToolbar?.text = value ?: ""
        }
    var navigationIcon: Int? = null

    var isEnableCollapsingBehaviour: Boolean = false

    // The value from which the arc is drawn
    protected var appbarBottom = 0f
    protected var appbarHalfWidth = 0f

    //region toolbarArc
    protected val arcHeight = context.resources.getDimensionPixelSize(R.dimen.toolbar_arc_height)
    protected val toolbarHeight = context.resources.getDimensionPixelSize(R.dimen.toolbar_height)
    val nonScrollableHeight = arcHeight + toolbarHeight

    protected val arcPaint = Paint().apply {
        color = context.getColor(R.color.accent2)
        style = Paint.Style.FILL
        isAntiAlias = true
    }
    protected val arcPath = Path()
    //endregion

    var contentChild: View? = null

    override fun onDraw(canvas: Canvas) {
        super.onDraw(canvas)
        drawArc(canvas)
    }

    fun updateToolbarTitleMargin(
        marginStart: Int = 0,
        marginTop: Int = 0,
        marginEnd: Int = 0,
        marginBottom: Int = 0
    ) {
        titleToolbar.layoutParams = Toolbar.LayoutParams(titleToolbar.layoutParams).apply {
            setMargins(marginStart, marginTop, marginEnd, marginBottom)
        }
    }

    protected fun initToolbar(toolbar: Toolbar) {
        navigationIcon?.let {
            toolbar.navigationIcon = ContextCompat.getDrawable(context, it)
            toolbar.setNavigationOnClickListener {
                (context as? Activity)?.onBackPressed()
            }
        }

        toolbar.findViewById<TextView>(R.id.titleToolbar)?.let { textView ->
            textView.text = title

            if (navigationIcon != null) {
                textView.layoutParams = Toolbar.LayoutParams(textView.layoutParams).apply {
                    setMargins(0, 0, 64.dp, 0)
                }
            }
        }
    }

    protected fun initAttrs(attrs: AttributeSet? = null, defStyleAttr: Int = 0, defStyle: Int = 0) {
        context.withStyledAttributes(
            attrs,
            R.styleable.RoundedAppBarLayout,
            defStyleAttr,
            defStyle
        ) {
            val defValue = -1

            title = getString(R.styleable.RoundedAppBarLayout_ral_title)
            getResourceId(R.styleable.RoundedAppBarLayout_ral_navigate_icon, defValue).apply {
                if (this != defValue) navigationIcon = this
            }
            isEnableCollapsingBehaviour =
                getBoolean(R.styleable.RoundedAppBarLayout_ral_collapsing_behaviour, false)
        }
    }

    protected open fun drawArc(canvas: Canvas) {
        val scale = (bottom - nonScrollableHeight) / (height - nonScrollableHeight).toFloat()

        contentChild?.alpha = max(0f, scale - (1 - scale))

        if (isEnableCollapsingBehaviour) collapsingBehaviour(scale)

        arcPath.apply {
            reset()
            moveTo(0f, appbarBottom)
            quadTo(
                appbarHalfWidth,
                //multiply by 2 due to arc drawing logic
                appbarBottom + (arcHeight * 2) * scale,
                width.toFloat(),
                appbarBottom
            )
        }
        canvas.drawPath(arcPath, arcPaint).apply {
            invalidate()
        }
    }

    private fun collapsingBehaviour(scale: Float) {
        titleToolbar?.alpha = 1 - scale
        contentChild?.y = (toolbarHeight - arcHeight).toFloat().dp
    }
}

class SimpleRoundedAppBarLayout @JvmOverloads constructor(
    context: Context,
    attrs: AttributeSet? = null,
    defStyleAttr: Int = 0
) : BaseAppBarLayout(context, attrs, defStyleAttr) {

    init {
        LayoutInflater.from(context).inflate(R.layout.appbar_rounded_simple, this, true)
        initView()
        initAttrs(attrs, defStyleAttr)
    }

    override fun onFinishInflate() {
        super.onFinishInflate()

        toolbar.setBackgroundColor(ContextCompat.getColor(context, R.color.accent2))
        initToolbar(toolbar)
    }

    override fun drawArc(canvas: Canvas) {
        val scale = (bottom - toolbarHeight) / (height - toolbarHeight).toFloat()
        val startDrawingHeight = appbarBottom + arcHeight * (1 - scale)

        arcPath.apply {
            reset()
            moveTo(0f, startDrawingHeight)
            quadTo(
                appbarHalfWidth,
                //multiply by 2 due to arc drawing logic
                appbarBottom + (arcHeight * 2) * scale,
                width.toFloat(),
                startDrawingHeight
            )
        }
        canvas.drawPath(arcPath, arcPaint).apply {
            invalidate()
        }
    }

    private fun initView() {
        setBackgroundColor(context.getColor(R.color.transparent))
        backgroundTintMode = PorterDuff.Mode.OVERLAY
        outlineProvider = null

        this.post {
            appbarBottom = height - arcHeight.toFloat()
            appbarHalfWidth = width / 2f
        }
    }
}

class RoundedAppBarLayout @JvmOverloads constructor(
    context: Context,
    attrs: AttributeSet? = null,
    defStyleAttr: Int = 0
) : BaseAppBarLayout(context, attrs, defStyleAttr) {

    private var isArcDrawn = false

    init {
        LayoutInflater.from(context).inflate(R.layout.appbar_rounded_default, this, true)
        initView()
        initAttrs(attrs, defStyleAttr)
    }

    override fun onFinishInflate() {
        super.onFinishInflate()
        if (childCount > 1) addContentView()

        val toolbar = LayoutInflater.from(context)
            .inflate(R.layout.toolbar_default, collapsingToolbar, false)
        removeView(toolbar)
        collapsingToolbar.addView(toolbar)

        (toolbar as? Toolbar)?.let { initToolbar(it) }
    }

    private fun initView() {
        setBackgroundColor(context.getColor(R.color.transparent))
        backgroundTintMode = PorterDuff.Mode.OVERLAY
        outlineProvider = null

        this.post {
            layoutParams = CoordinatorLayout.LayoutParams(width, height + arcHeight)
            appbarBottom = height.toFloat()
            appbarHalfWidth = width / 2f
            isArcDrawn = true
        }
    }

    private fun addContentView() {
        val contentChild = this.getChildAt(1)
        removeView(contentChild)

        val layoutParams = CollapsingToolbarLayout.LayoutParams(contentChild.layoutParams)
            layoutParams.setMargins(
                marginStart,
                marginTop + toolbarHeight,
                marginEnd,
                marginBottom
            )

        contentChild.setBackgroundColor(context.getColor(R.color.accent2))
        contentChild.layoutParams = layoutParams
        this.contentChild = contentChild

        collapsingToolbar.addView(contentChild)
    }
}
Тот Toolbar, в котором нет контента, теперь можно сделать цветом. Делаем это потому, что теперь не будет эффекта затемнения, как было на гифке в первом пункте (так как контента, кроме Toolbar, нет), поэтому мы можем просто задать цвет, и всё будет отлично работать. Здесь показываю, как в итоге было сделано.
Здесь я уже мог добавить ArcView — саму вьюшку дуги — и не беспокоиться с тем, что там не будет транспарентного расстояния. Теперь CollapsingToolbar будет transparent, Toolbar остаётся с цветом, а AppBarLayout не требует расширения.
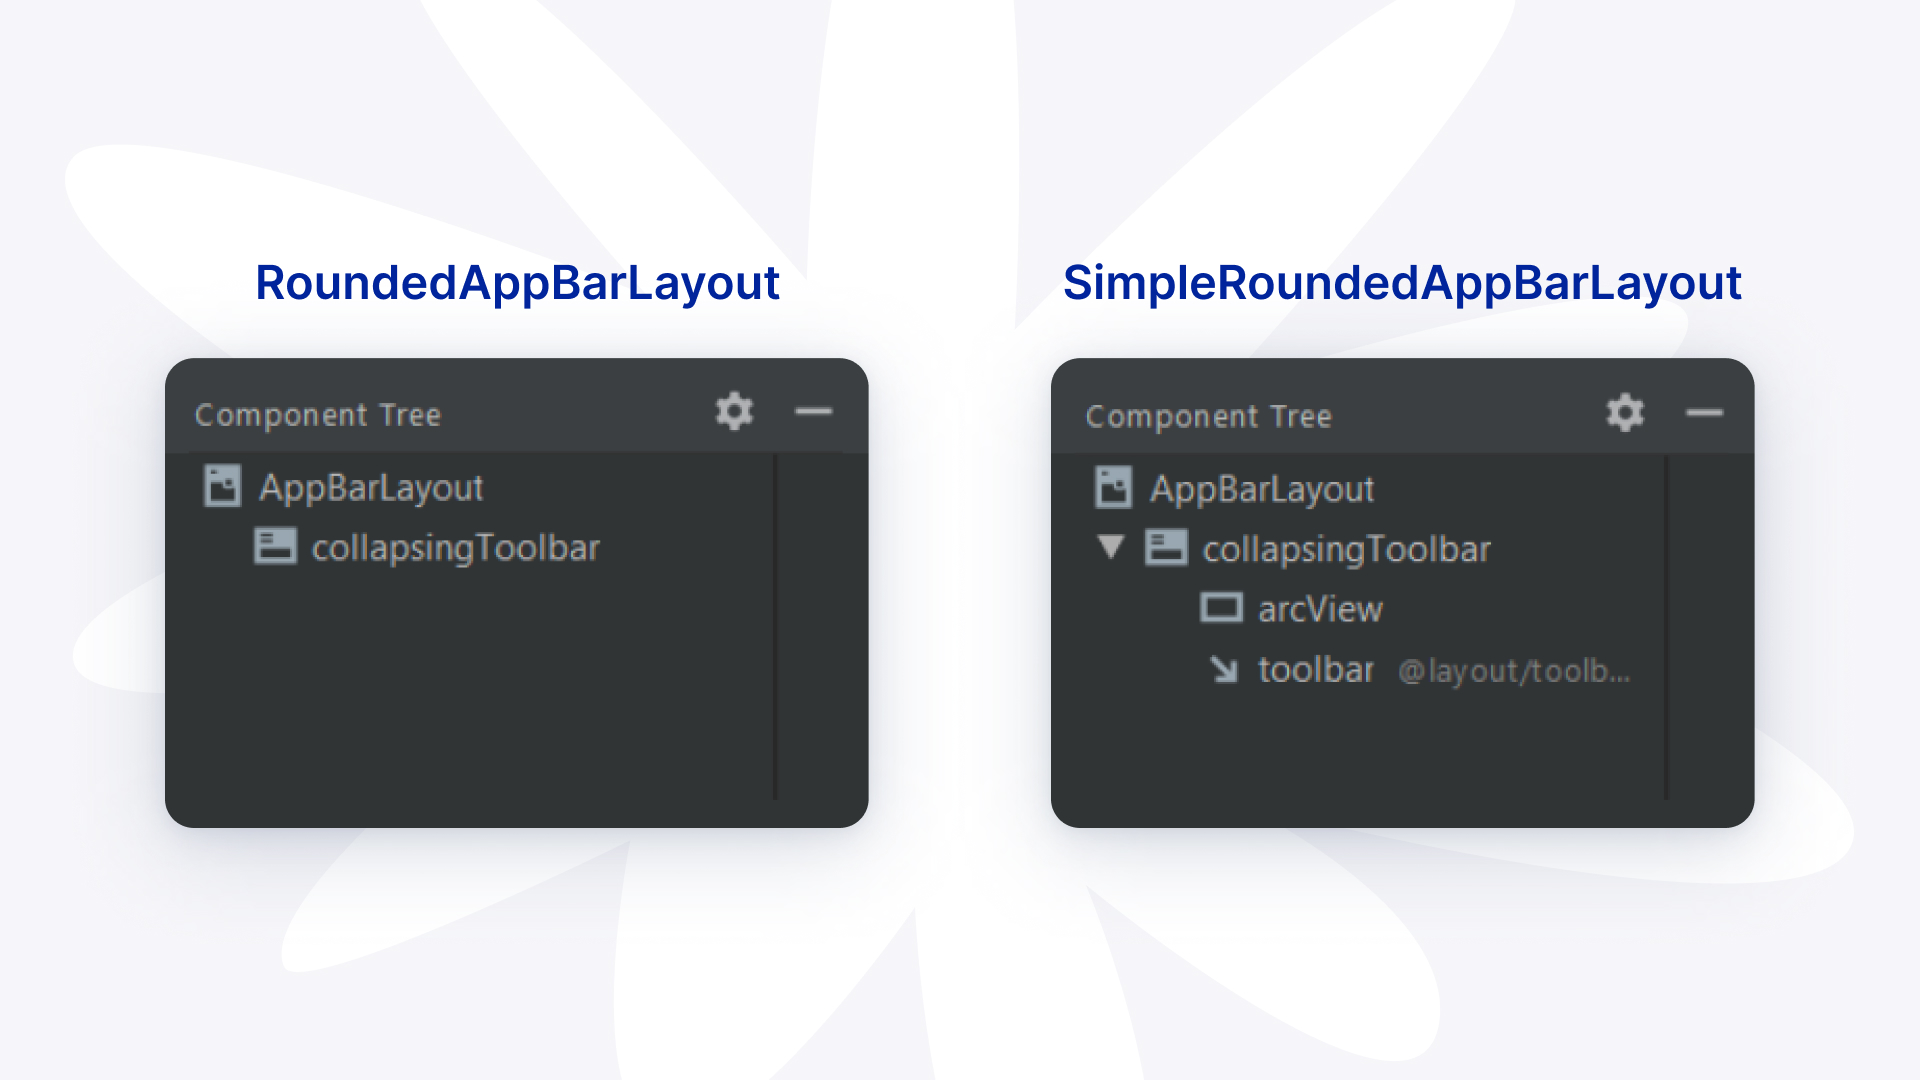
Единственное, что нам пришлось изменить в коде, — изменить высоту и переделать рисование дуги, потому что так как там нет Child, то не надо ничего затемнять.
XML-код для SimpleRoundedAppBarLayout и RoundedAppBarLayout
<?xml version="1.0" encoding="utf-8"?>
<merge xmlns:android="http://schemas.android.com/apk/res/android"
    xmlns:app="http://schemas.android.com/apk/res-auto"
    xmlns:tools="http://schemas.android.com/tools"
    android:layout_width="match_parent"
    android:layout_height="wrap_content"
    android:background="@color/transparent"
    android:orientation="vertical"
    tools:parentTag="com.google.android.material.appbar.AppBarLayout">

    <com.google.android.material.appbar.CollapsingToolbarLayout
        android:id="@+id/collapsingToolbar"
        android:layout_width="match_parent"
        android:layout_height="wrap_content"
        android:background="@color/transparent"
        app:layout_scrollFlags="scroll|snap|exitUntilCollapsed">

        <View
            android:id="@+id/arcView"
            android:layout_width="match_parent"
            android:layout_height="48dp"
            android:layout_marginTop="56dp"
            android:background="@color/transparent" />

        <include
            android:id="@+id/toolbar"
            layout="@layout/toolbar_default"
            android:layout_width="match_parent"
            android:layout_height="56dp"
            android:layout_gravity="top"
            app:layout_collapseMode="pin" />

    </com.google.android.material.appbar.CollapsingToolbarLayout>
</merge>

<?xml version="1.0" encoding="utf-8"?>
<merge xmlns:android="http://schemas.android.com/apk/res/android"
    xmlns:app="http://schemas.android.com/apk/res-auto"
    xmlns:tools="http://schemas.android.com/tools"
    android:layout_width="match_parent"
    android:layout_height="wrap_content"
    android:background="@color/transparent"
    tools:parentTag="com.google.android.material.appbar.AppBarLayout">

    <com.google.android.material.appbar.CollapsingToolbarLayout
        android:id="@+id/collapsingToolbar"
        android:layout_width="match_parent"
        android:layout_height="wrap_content"
        android:background="@color/accent2"
        app:layout_scrollFlags="scroll|snap|exitUntilCollapsed">

    </com.google.android.material.appbar.CollapsingToolbarLayout>
</merge>
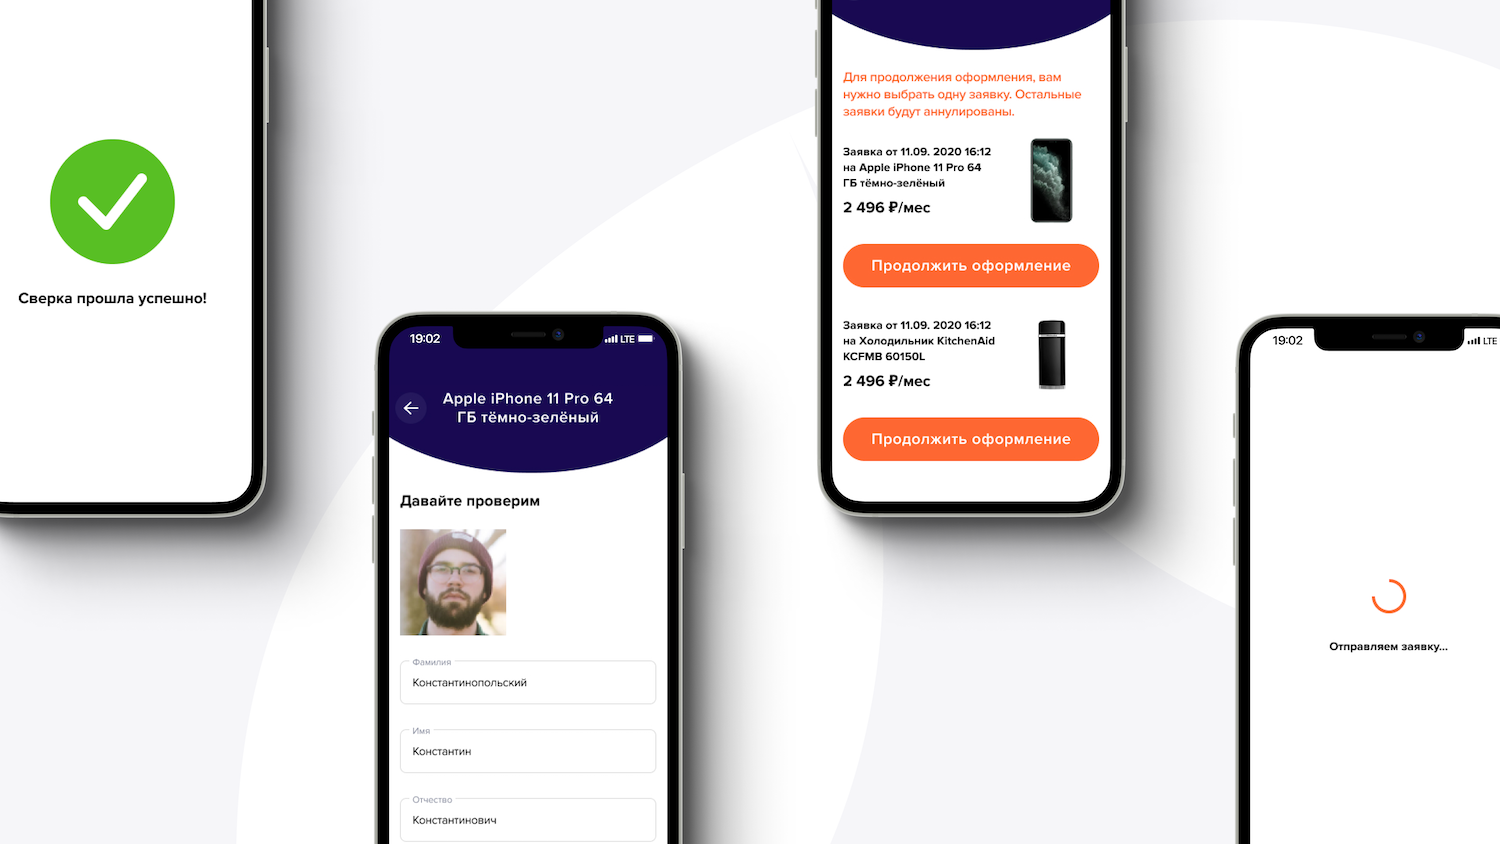
№6. При скрытии и показе AppBarLayout в активности появляется белая полоса
Далее у нас возникли последствия метода «инкостыляции» при выставлении visibility.
У нас есть одна активность и на ней много фрагментов. Сверху активности находится RoundedAppBarLayout, а внизу — контейнер для фрагментов. Если во время переключения между фрагментами менять visibility, то появляется белая полоса.
Причина — у дочернего контейнера для фрагмента выставлялся margin. Белая полоса — это и есть тот самый margin.
Решение
Дополнить кастомный Behavior и добавить в него VisibilityListener.
Новый код Behavoir
class RoundedAppBarBehavior(context: Context, attrs: AttributeSet) :
    AppBarLayout.ScrollingViewBehavior(context, attrs) {

    private var isInstalled = false

    override fun layoutDependsOn(
        parent: CoordinatorLayout,
        child: View,
        dependency: View
    ): Boolean {
        if (!isInstalled && dependency is BaseAppBarLayout) {
            isInstalled = true
            child.setRoundedAppBarBehavior()
            addVisibilityListener(dependency, child)
        }
        return super.layoutDependsOn(parent, child, dependency)
    }

    private fun addVisibilityListener(appBarLayout: AppBarLayout, child: View) {
        var isVisibleSaved = appBarLayout.isVisible

        val visibilityListener = ViewTreeObserver.OnGlobalLayoutListener {
            if (isVisibleSaved != appBarLayout.isVisible) {
                isVisibleSaved = appBarLayout.isVisible

                if (isVisibleSaved) {
                    child.setRoundedAppBarBehavior()
                } else {
                    child.removeRoundedAppBarBehavior()
                }
            }
        }

        appBarLayout.viewTreeObserver.addOnGlobalLayoutListener(visibilityListener)
        appBarLayout.doOnDetach {
            appBarLayout.viewTreeObserver.removeOnGlobalLayoutListener(visibilityListener)
        }
    }
}
Здесь я подписываюсь на GlobalLayout, когда doOnDetach — отписываюсь от него. Если он видим, тогда я добавляю ему RoundedBehavior, то есть добавляю margin, если он невидим — я убираю их. Это делается для того, чтобы не возникали утечки памяти при работе в приложении.
№7. Белое пространство при нескроллящемся контенте в Child
Прилетел ещё один баг. В профиле клиента появляется белая полоса, если child содержит нескроллящийся контент.
Когда я работал со списками, применялся мой Behavior — весь список прокручивался, и всё работало отлично. Как только в Layout, на который применялся behaviour, появилась статическая часть, то margin сверху оставался.
Решение
Добавить кастомный ScrollListener. Он сделал отображение AppBarLayout ещё более красивым, в скролл — плавным.
Обновлённый код
class RoundedAppBarBehavior(context: Context, attrs: AttributeSet) :
    AppBarLayout.ScrollingViewBehavior(context, attrs) {

    private var isInstalled = false

    private val arcHeight = context.resources.getDimensionPixelSize(R.dimen.toolbar_arc_height)

    override fun layoutDependsOn(
        parent: CoordinatorLayout,
        child: View,
        dependency: View
    ): Boolean {
        if (!isInstalled && dependency is BaseAppBarLayout) {
            isInstalled = true
            child.setRoundedAppBarBehavior()
            addVisibilityListener(dependency, child)
            addOnScrollListener(dependency, child)
        }
        return super.layoutDependsOn(parent, child, dependency)
    }

    private fun addOnScrollListener(appBarLayout: BaseAppBarLayout, child: View) {
        val scrollListener = AppBarLayout.OnOffsetChangedListener { _, _ ->
            val divider = (appBarLayout.height - appBarLayout.nonScrollableHeight).toFloat()
            val scale =
                if (divider == 0f) 1f else (appBarLayout.bottom - appBarLayout.nonScrollableHeight) / divider

            child.setPadding(
                child.paddingLeft,
                max(0, (arcHeight * scale).toInt()),
                child.paddingEnd,
                child.paddingBottom
            )
        }

        appBarLayout.addOnOffsetChangedListener(scrollListener)
        appBarLayout.doOnDetach {
            appBarLayout.removeOnOffsetChangedListener(scrollListener)
        }
    }

    private fun addVisibilityListener(appBarLayout: AppBarLayout, child: View) {
        var isVisibleSaved = appBarLayout.isVisible

        val visibilityListener = ViewTreeObserver.OnGlobalLayoutListener {
            if (isVisibleSaved != appBarLayout.isVisible) {
                isVisibleSaved = appBarLayout.isVisible

                if (isVisibleSaved) {
                    child.setRoundedAppBarBehavior()
                } else {
                    child.removeRoundedAppBarBehavior()
                }
            }
        }

        appBarLayout.viewTreeObserver.addOnGlobalLayoutListener(visibilityListener)
        appBarLayout.doOnDetach {
            appBarLayout.viewTreeObserver.removeOnGlobalLayoutListener(visibilityListener)
        }
    }
}
Здесь вычисления примерно такие же, как с рисованием дуги: рассчитывается, рассчитывается коэффициент скролла scale, где 0 — это полностью скрытая дуга, а 1 — полностью раскрытая дуга. Теперь расстояние контента до дуги будет точно рассчитываться во время скролла.
Как выглядит проблема и решение

Как сделать за полчаса то, с чем я провозился сутки

Я прикидывал много вариантов, как можно было бы сделать похожее поведение с CoordinatorLayout, но, к сожалению, в AppBarLayout нельзя сделать прокрутку у контента, который находится ниже статического. Даже если добавить два AppBarLayout, они всё равно будут криво работать.
Когда мы изначально анализировали, как сделать анимацию на главном экране, то казалось, что с задачей не возникнет никаких проблем. Только в ходе проекта начали находить разные баги в том методе, который мы выбрали, и поняли, что есть много кейсов, где стандартное поведение не работает.
С каждым новым багом мы вносили новые изменения, дописывали и доделывали. Уже в финале мы осознали, что лучше было выбрать другое решение. Тогда я бы смог реализовать задачу за полчаса вместо суток.
На какие решения я предлагаю обратить внимание:
1) Написать свой наследник FrameLayout
С ним можно делать всё, что угодно: и на канвасе рисовать, и двигать вьюшки, как хочется.
2) Использовать MotionLayout
Используя MotionLayout, реализовать дугу в AppBarLayout можно буквально за 30 минут! Для этого достаточно указать все нужные элементы на фрагменте или активности, а потом, используя встроенные инструменты, задать поведение при анимации.
???? Пример реализации дуги в Motion Layout — на Гитхабе.

